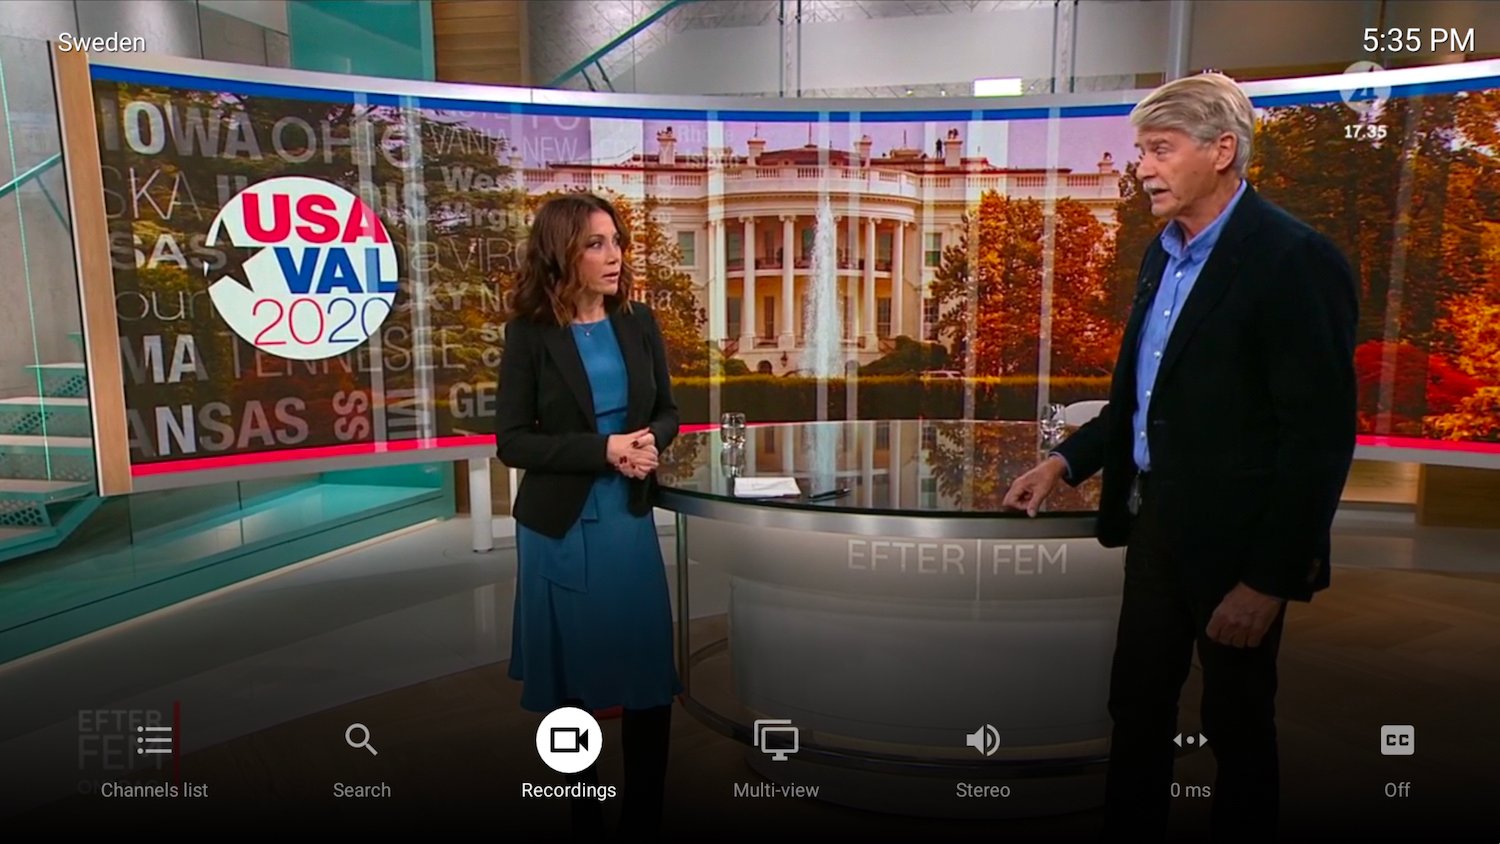
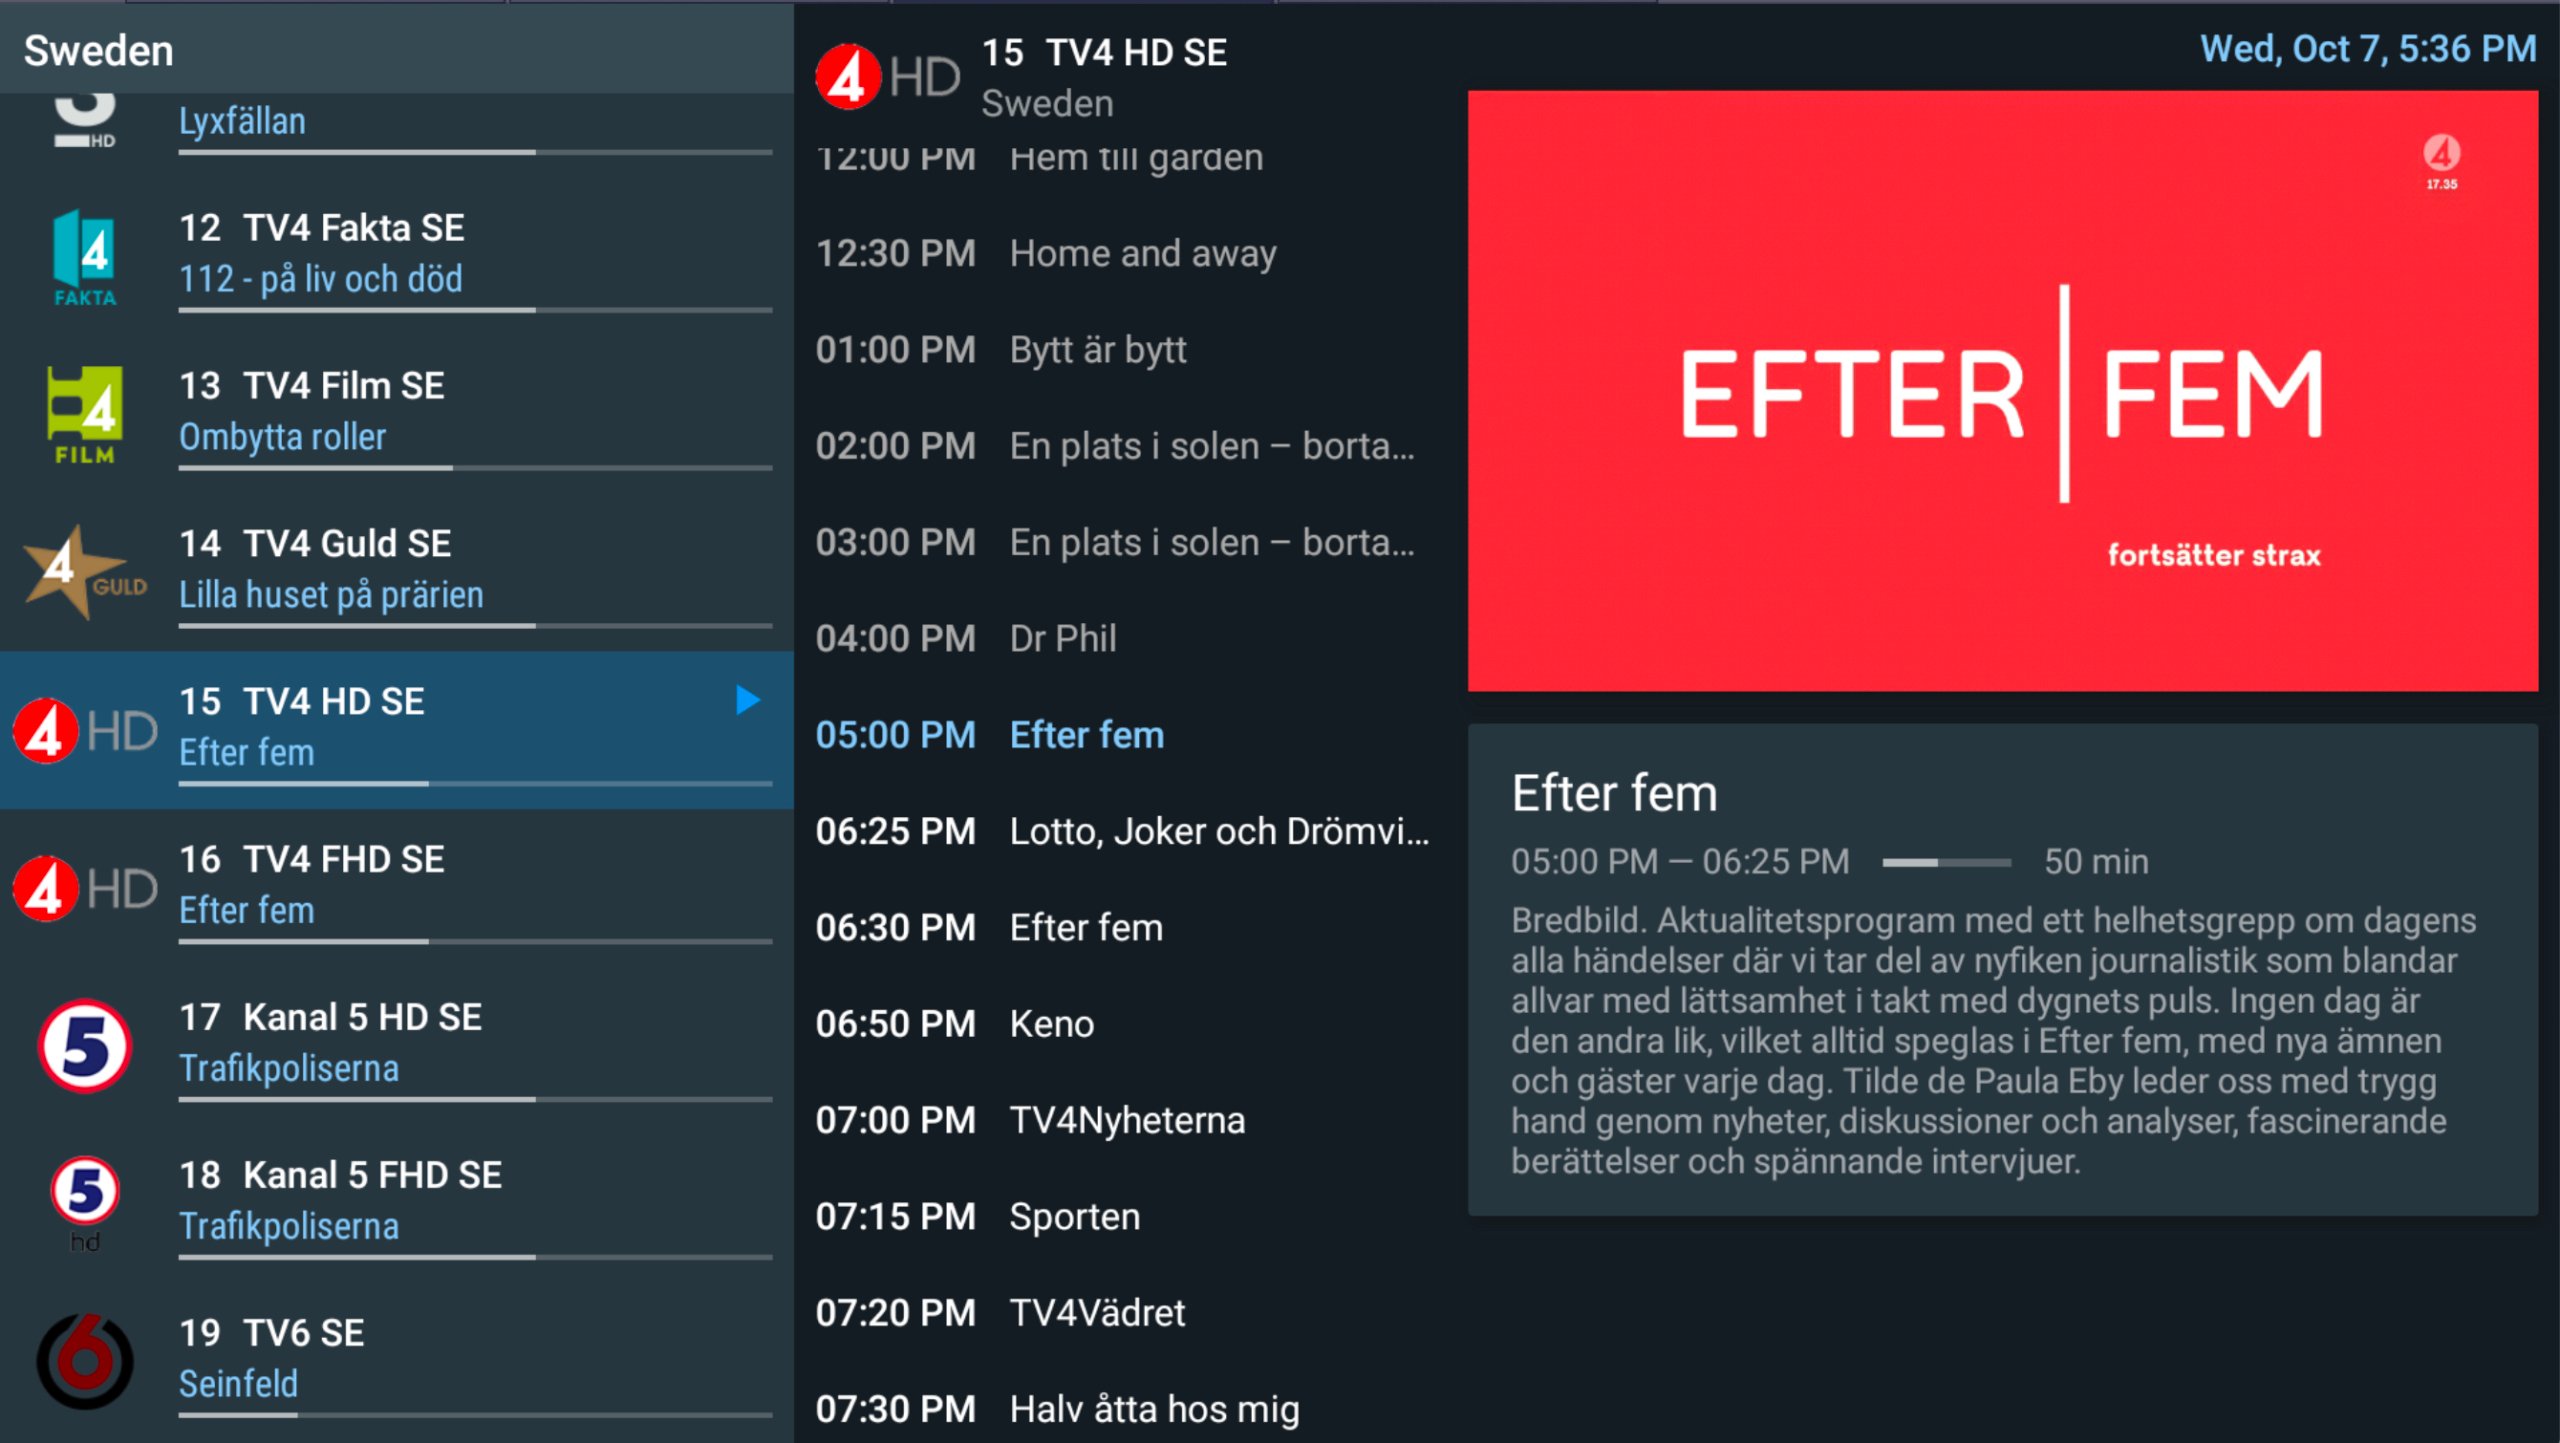
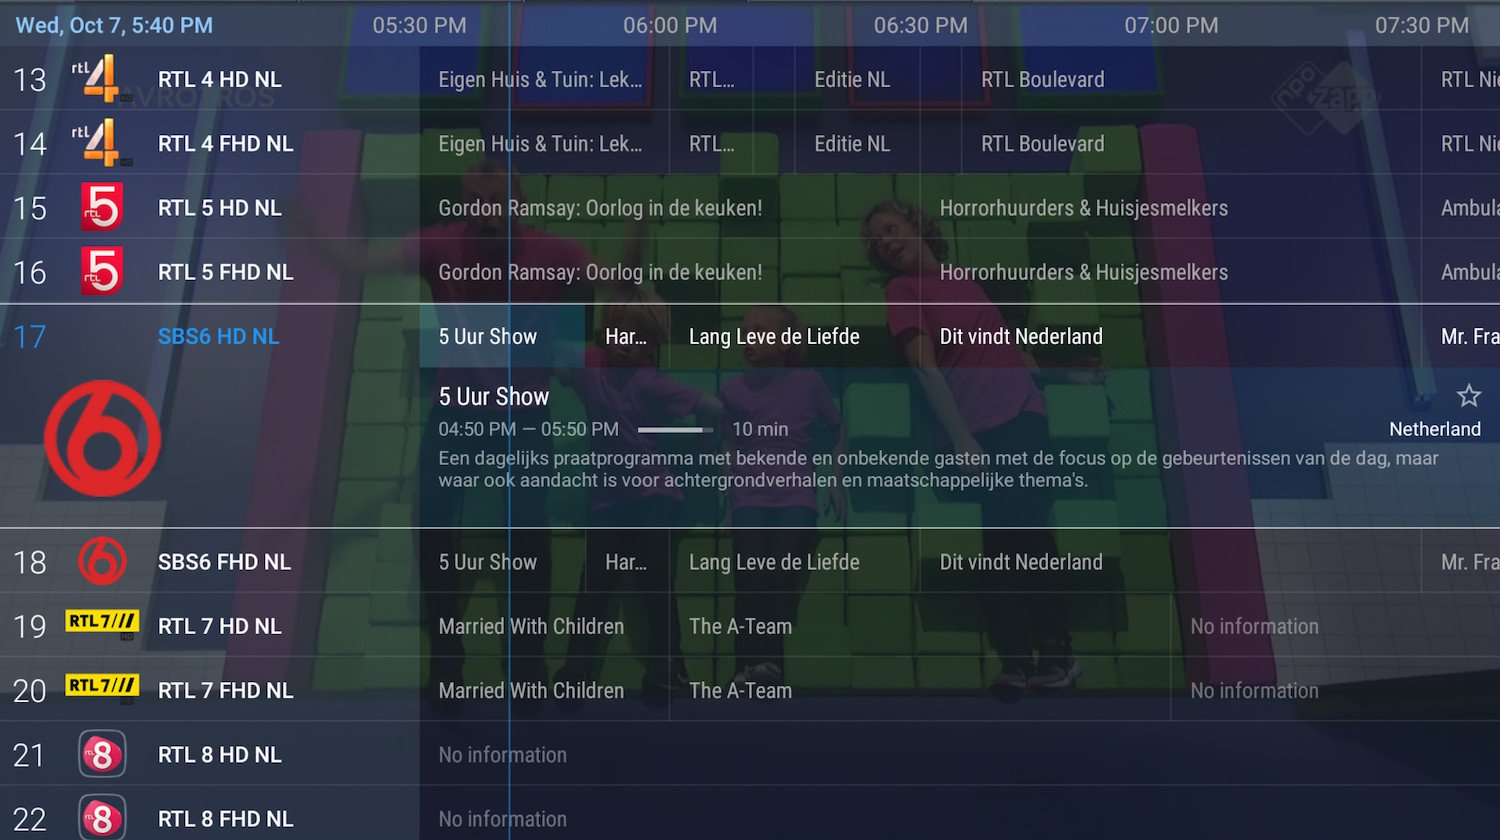
We highly recommend to install both Duplex IPTV for Main APP and IPTV SMARTER for backup solutions
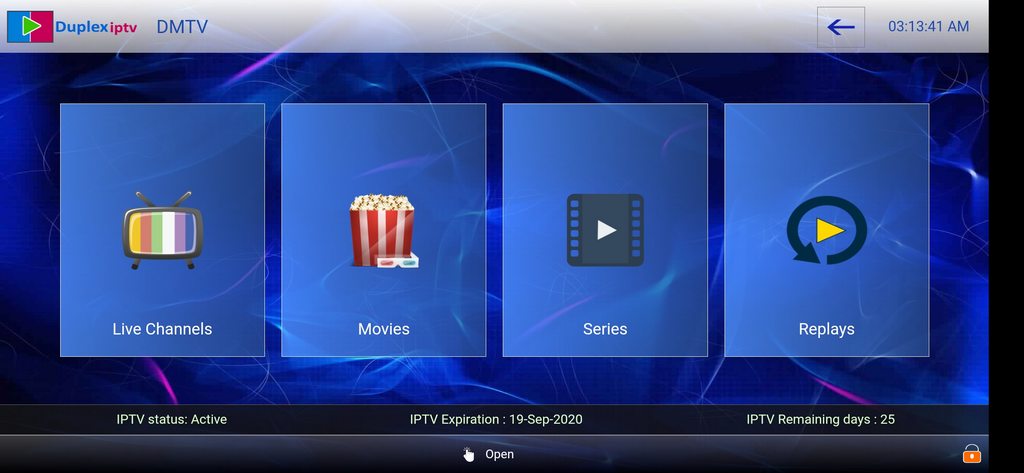
Overview
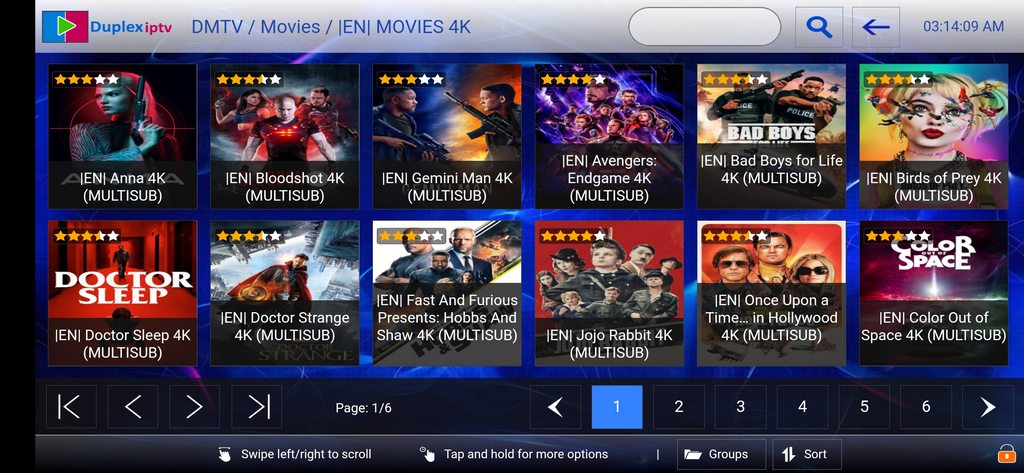
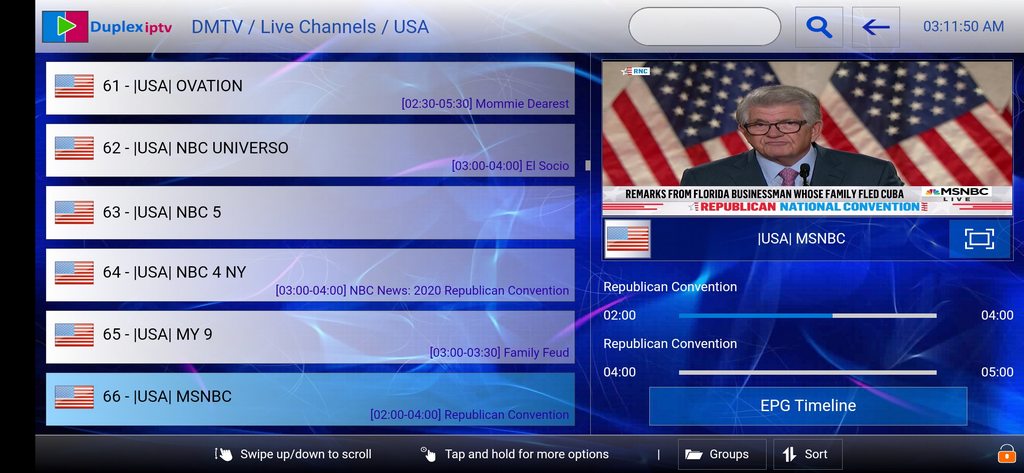
Its one of multiple platform support application to run your IPTV subscription contents. Duplex IPTV have easy to use interface and easy IPTV installation.
Most important feature are:
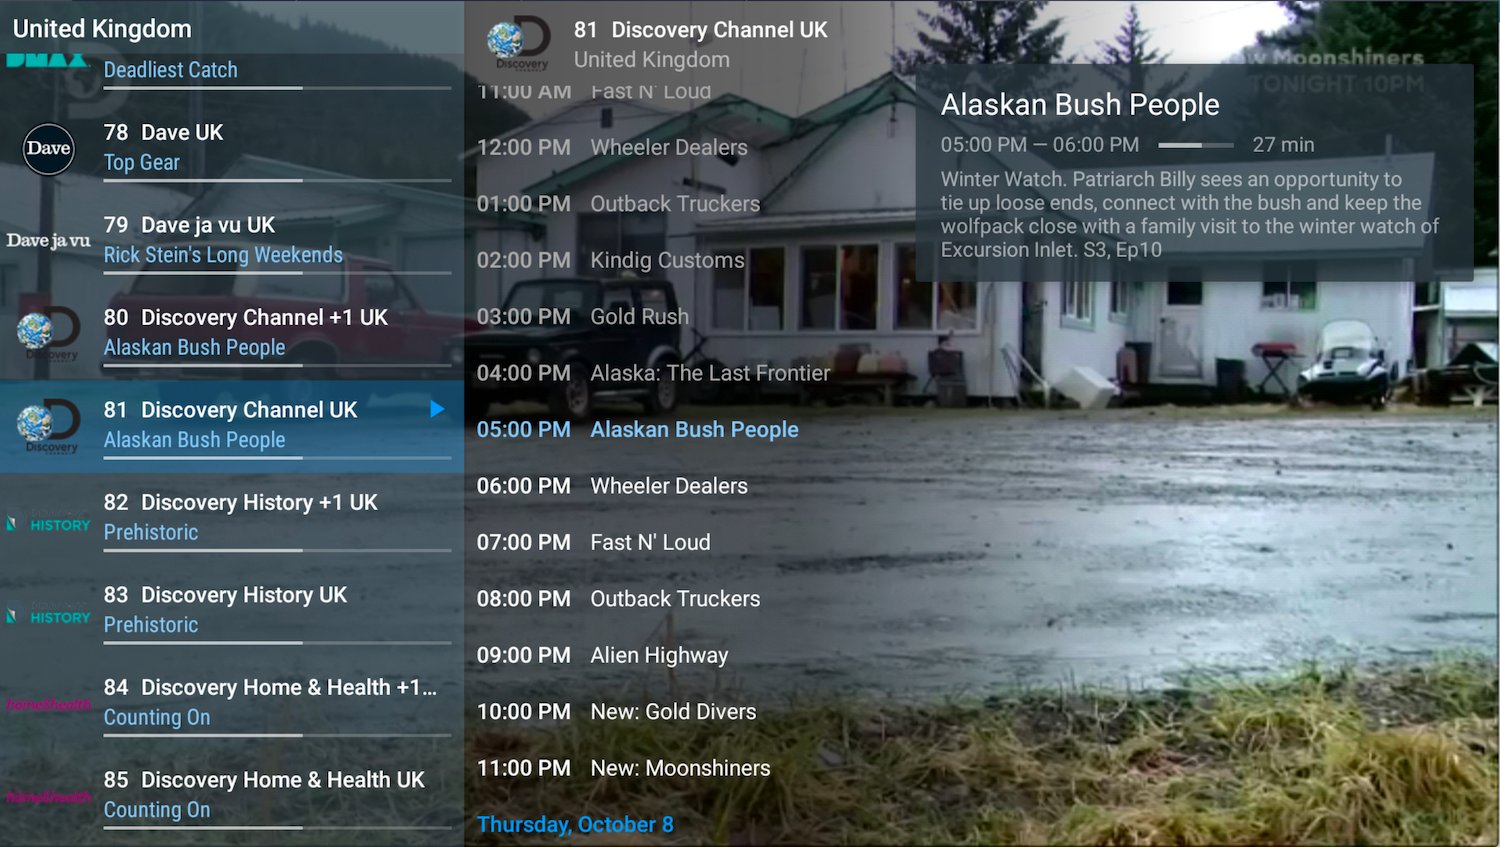
1- Multiple favorite lists
2- EPG support
3- Fast zapping
4- Small Preview beside channels list
5- Channels list over channel screen .
6- Parent Control
install Duplex IPTV
This IPTV application available for many different operating systems and devices :
Android and Android TV play store: https://play.google.com/store/apps/details?id=com.duplexiptv
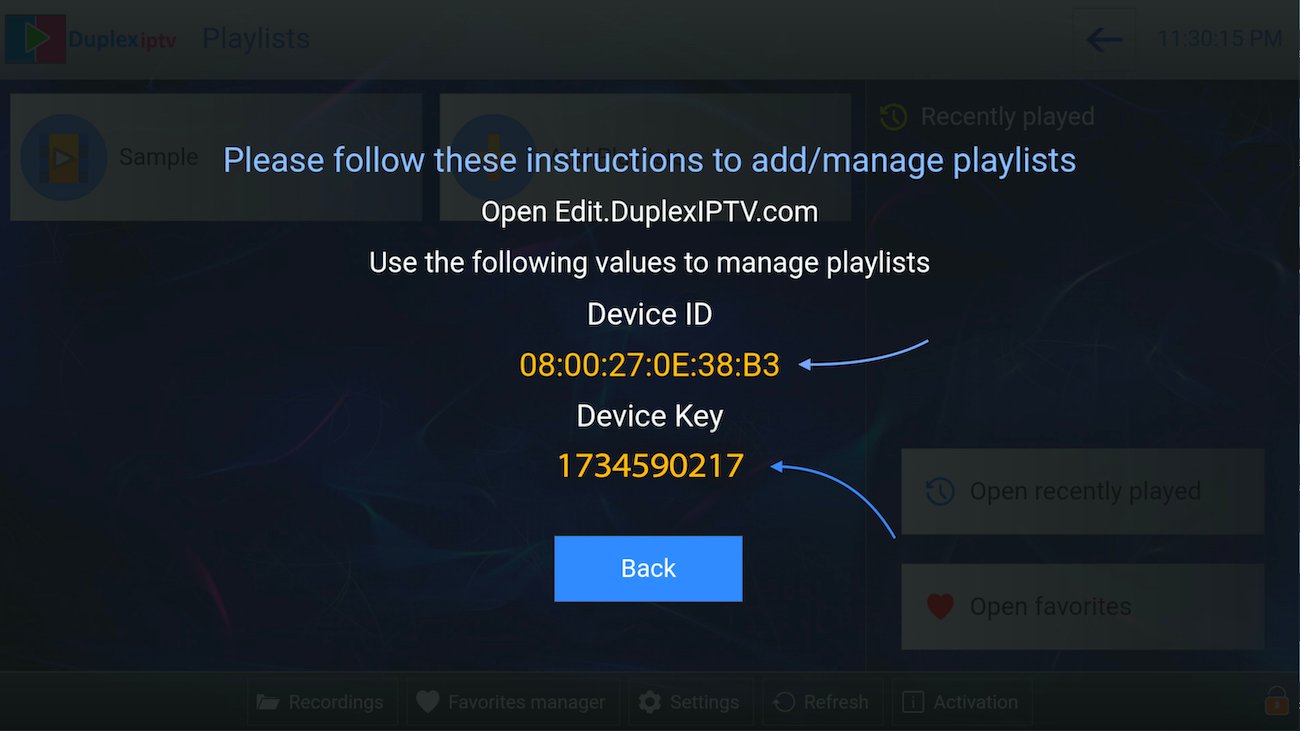
Open Duplex IPTV and you will see the Device ID and Device key (You can find it by choose activation tab too)
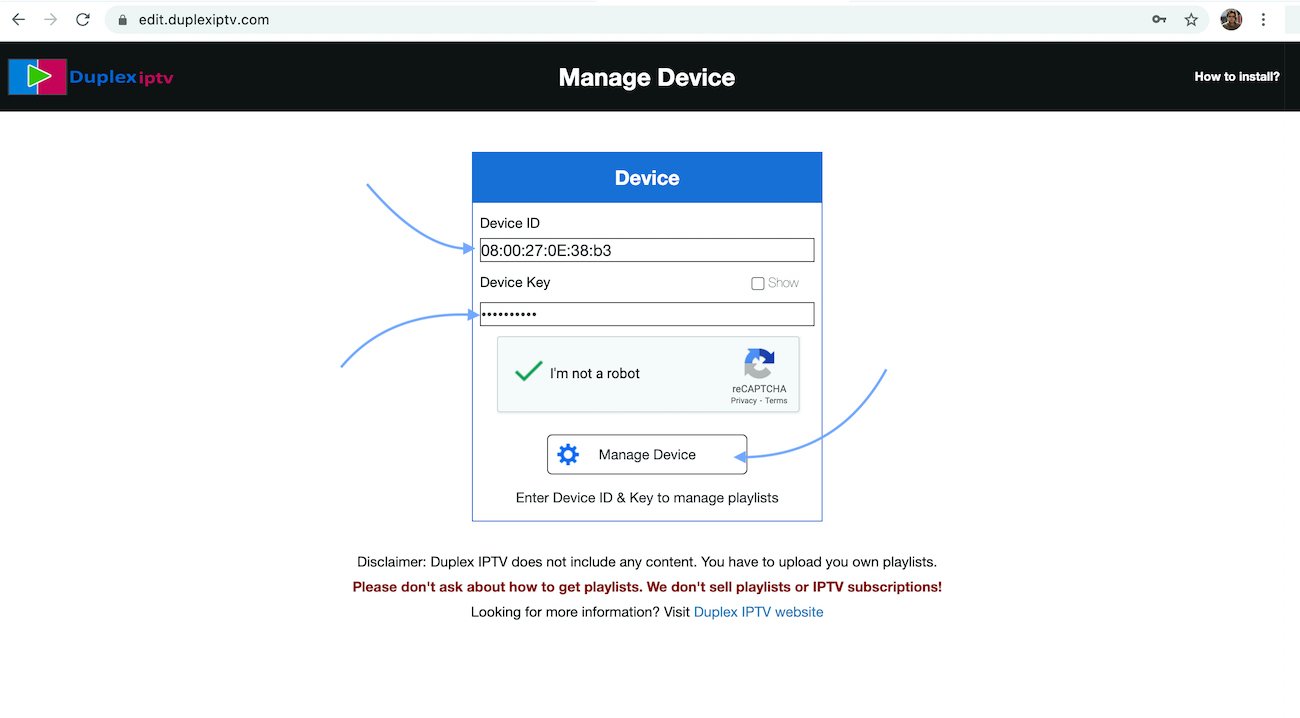
2.Login into Duplex IPTV management portal
Navigate to edit.duplexplay.com and Enter Device ID and Device key you noted in step 1 , Then click on Manage Device
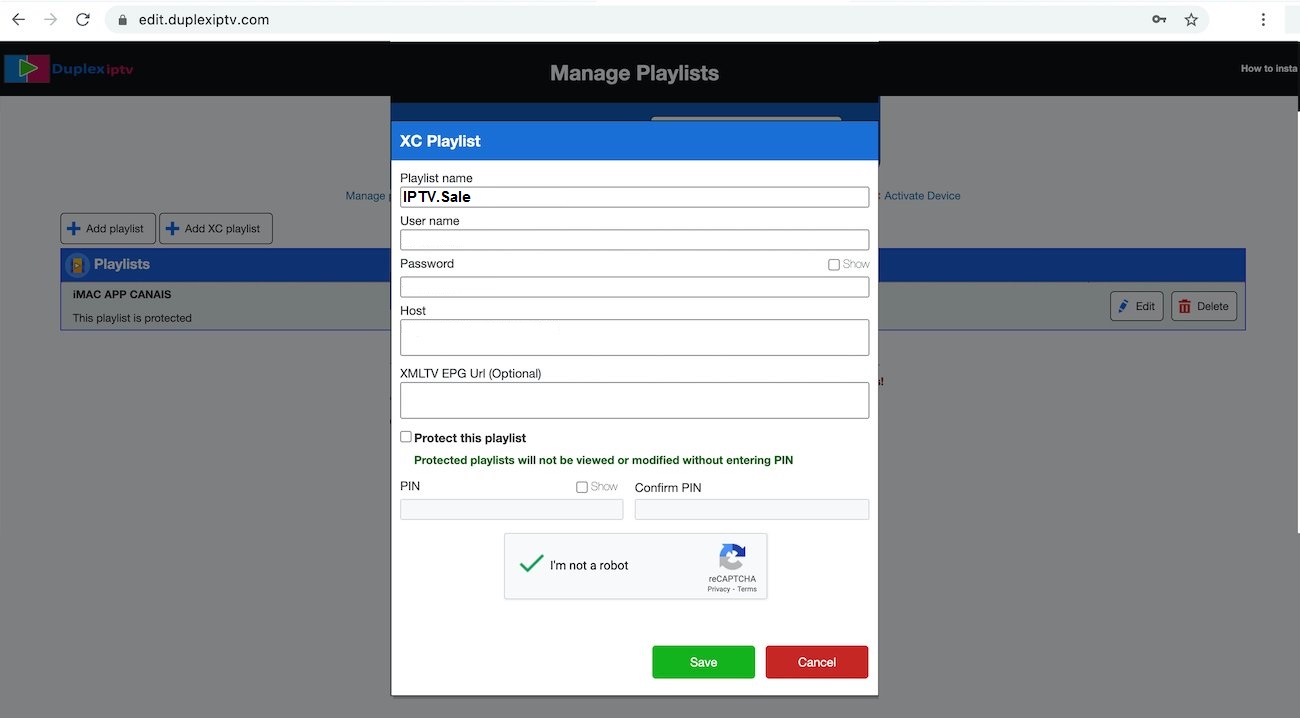
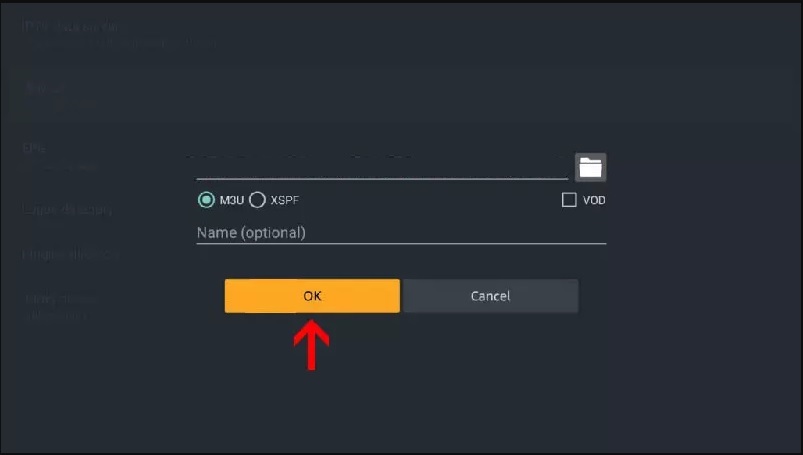
3.Add XC Playlist
You can add playlist via both method M3u Link and Xtream connection , We recommend to connect via XC (xtream) playlist.
and Fill your Xtream connection details which you must receive by Email after Purchase.
Playlist Name: You can set any name for your playlist.
Enter Username , Password and Host (Server URL of xtream connection). Activate Captcha and click on Save .
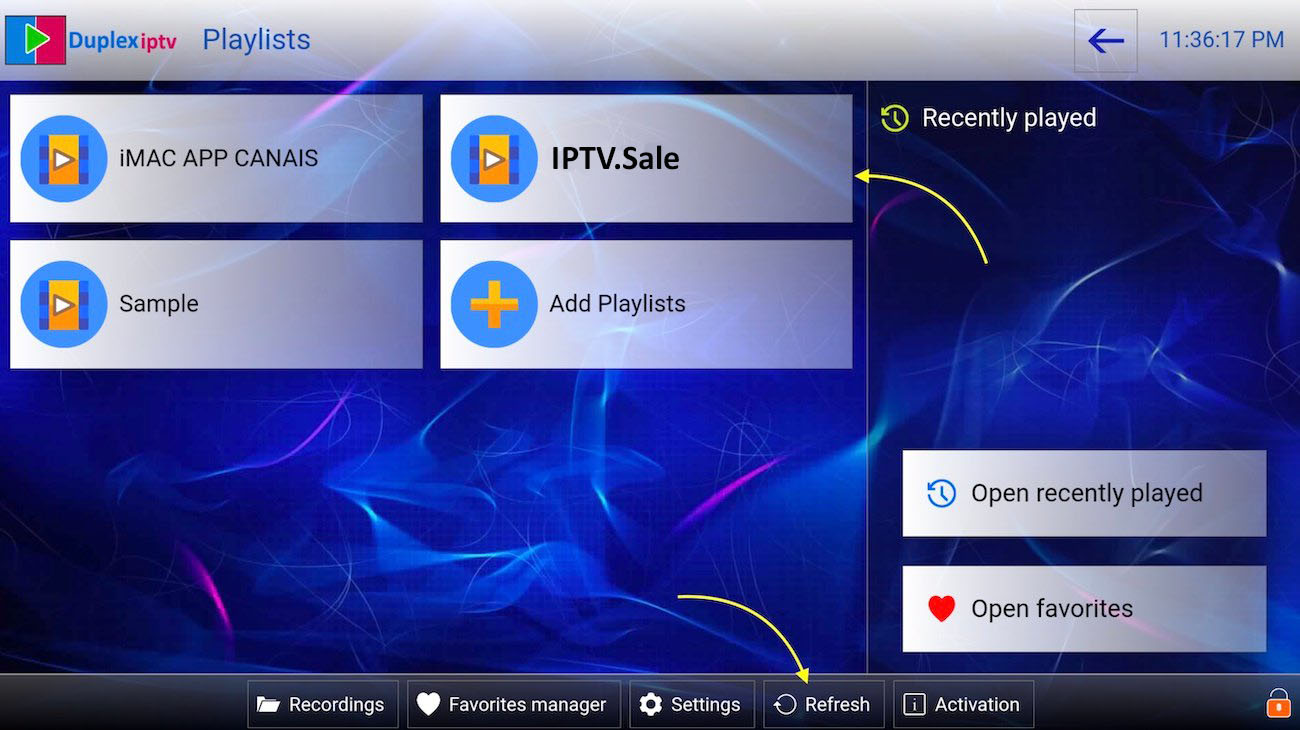
4.Refresh Playlists in application
Then back to Duplex IPTV application and choose Refresh to reload Playlists , Then the playlist name must appears .
Overview
IPTV Smarters is an Application which released based on Xtream Codes in beginning , But M3u link and local file list supported in last updates too. Friendly and easy GUI is most important point in this app . This app available for Android , iOS and Smart TVs ( WebOS, Tizen , Android).
You can download IPTV smarter from :
Android play store: https://play.google.com/store/apps/details?id=com.nst.iptvsmarterstvbox
1. Open IPTV Smarters
2. click ACCEPT
3. ADD new User
4. Login with Xtream Codes API
Xtream Codes API is sent to you in your email
here is the window where you can enter your details:
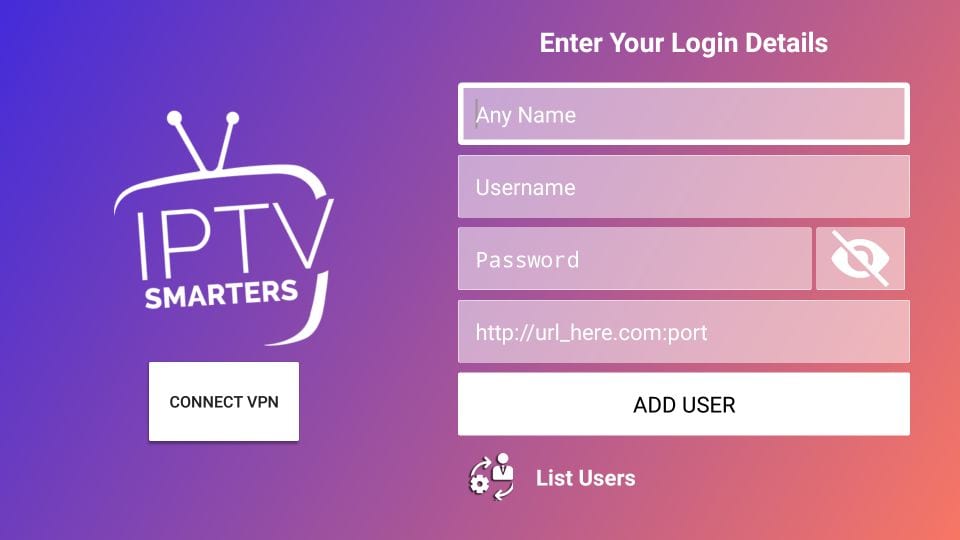
Click on ADD User
And Enjoy the Service!
IPTV EXTREME PRO features
Integrated Player (Advanced & Light)
Chromecast Support (Beta)
Parental Control
Remote Controller support
Backup / Restore Settings
M3U playlists support
Multi EPG support (TV Guide)
Auto EPG update
EPG alias management
All the EPG providers are included
Picons support in different size
Ability to download On Demand Programs!
Ability to record Live Streaming with time limit!
More than 10 Themes available!
Time Recording
Timers Management
Autostart On Boot Function
Set Memo function for Events on TV Guide
Search for Similar Events on TV Guide
Sliding EPG time
Download the IPTV Extreme or IPTV Extreme pro from the google play store.
Free Version –
https://play.google.com/store/apps/details?id=com.pecana.iptvextreme&hl=en_GB
Paid Version –
https://play.google.com/store/apps/details?id=com.pecana.iptvextremepro&hl=en_GB
How to add IPTV channels to IPTV EXTREME PRO
Step 1: After downloading the version of your choice, start the application and wait for it to load up.

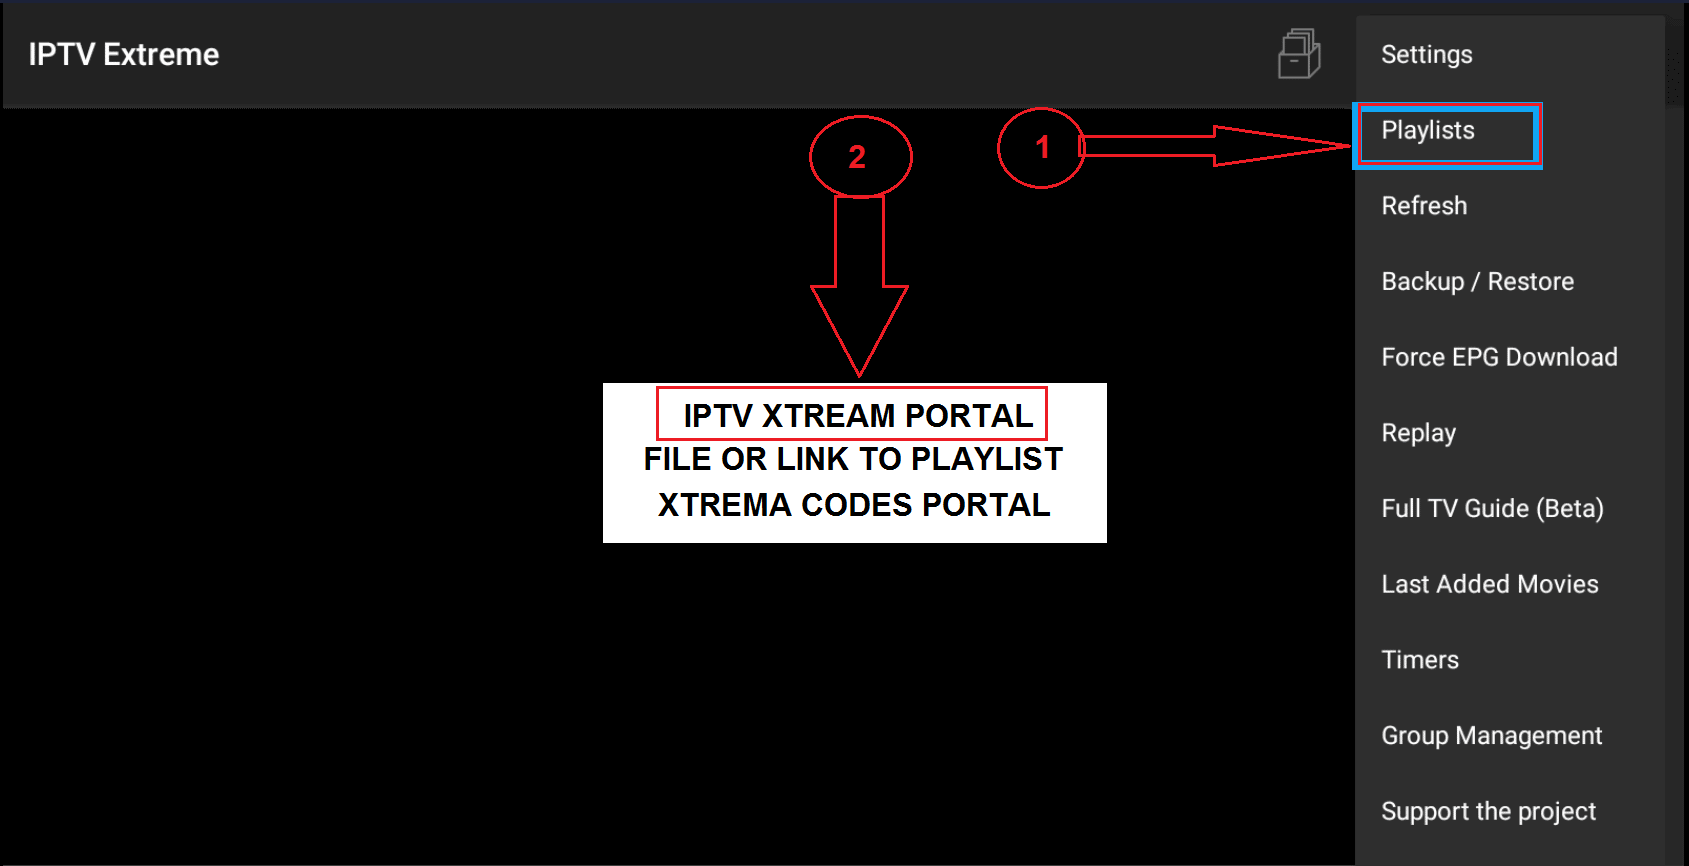
Step 2: Now click on the three dots on the upper right corner of your screen.
Step 3: Now select “Playlists” as depicted via a red arrow.
Step 4: Now click on “ADD PLAYLIST” and proceed to the next section.
Step 5: Choose IPTV XTREAM PORTAL
Step 6: Tap on COPY ( Mac address will be copied)
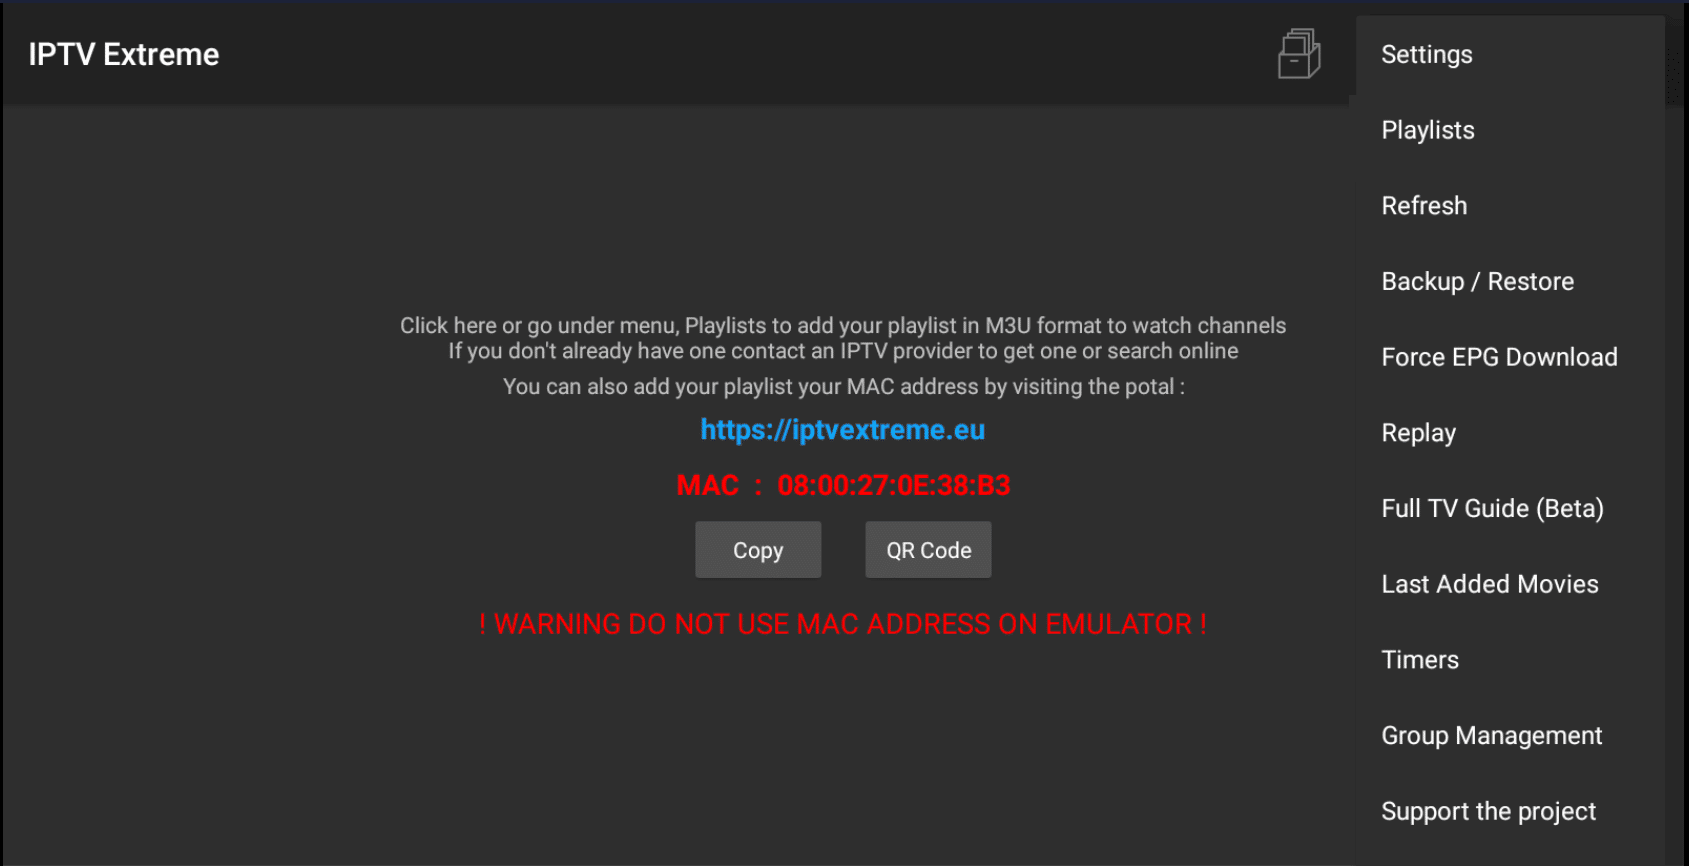
Step 7: Open https://iptvextreme.eu
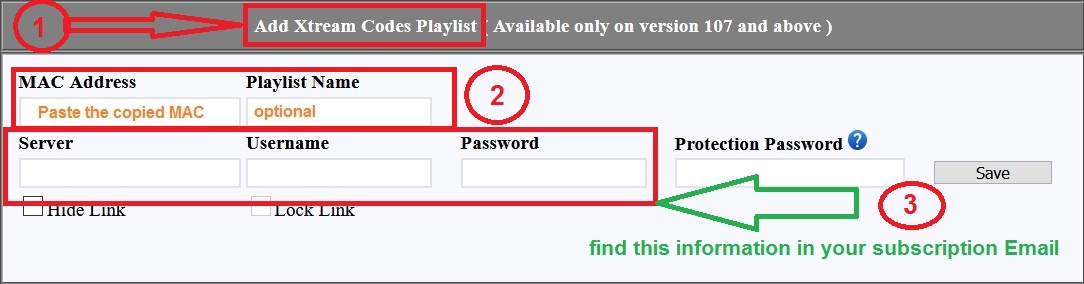
Step 8: tap on SAVE button
Step 9: Close and Open the APP , and wait for downloading the playlist
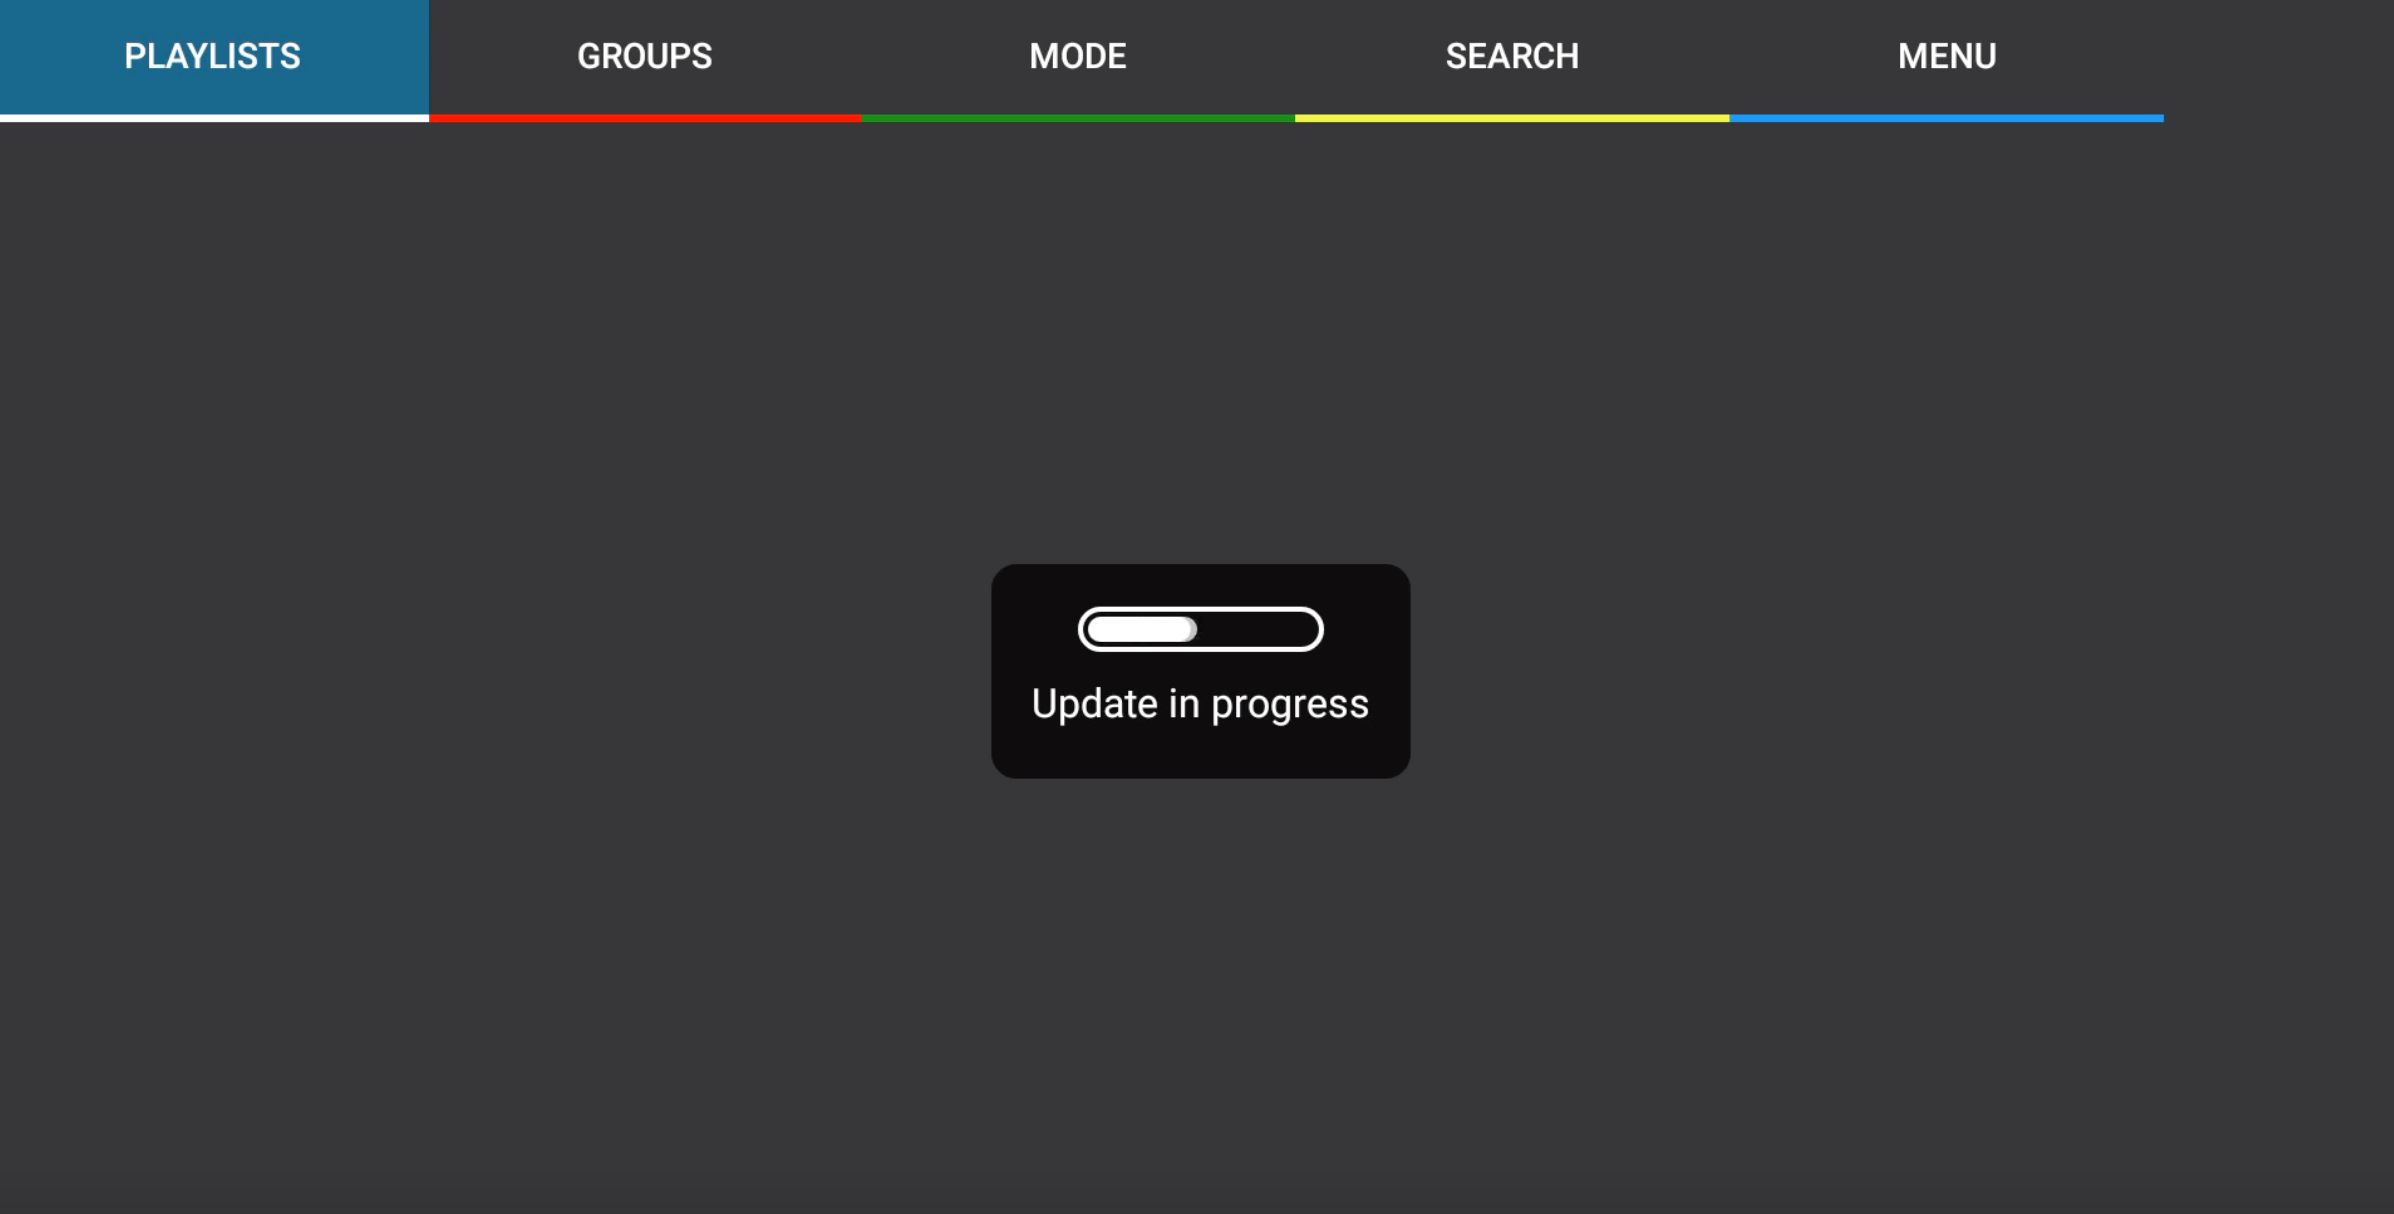
Step 10:Channels should load now. If you want to see groups (given that the IPTV provider of your choice does categorize channels), move right and select Groups tab.
Overview
It’s one of the most advanced IPTV players with many features to customization. This IPTV player developed based m3u link. In order to add IPTV channels, you must add your own m3u playlists inside the settings section.Perfect Player is available on Android and Microsoft Windows. Price: This app is free with advertising. to remove advertisements you need to purchase a premium version
Download and Install Perfect player
Download from play store and install then open the APP
Install IPTV on Perfect Player
Time needed: 6 minutes.
INSTALL IPTV SUBSCRIPTION ON PERFECT PLAYER
1. Select Settings.
After the Application is downloaded on your device, open it. On the main menu, click on “Settings“.

2.Add M3u link
Navigate to General > Playlist
Enter your m3u link in URL or File path section
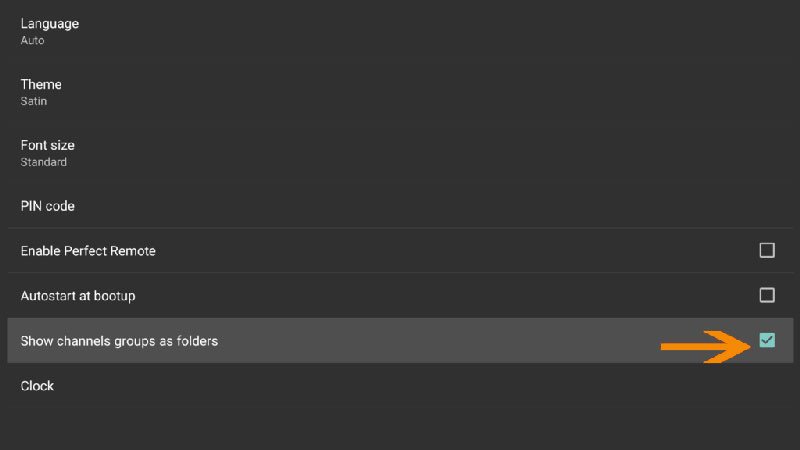
3.Active Channels group
For huge playlist , its better to active group categories features .
Navigate to Settings > GUI and active Show channels group as folders
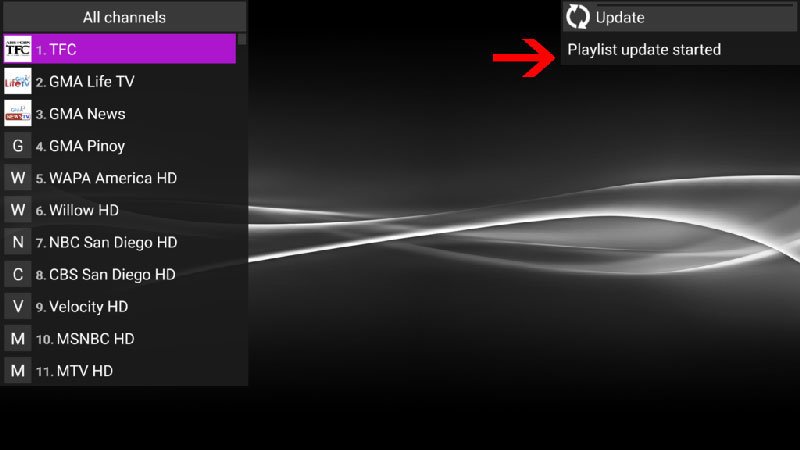
4.Loading channels and VOD
Now head back to the main screen and you will see that the channels and VOD are being updated and added to your perfect player .
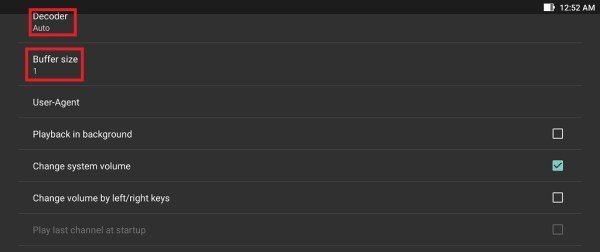
Playback Troubleshooting
If you are facing playback issues, stuttering, buffering, etc. Perfect Player enables you to select the type of decoder and change the buffer size. Under the playback settings, you can choose from different types of decoders.Auto is the best default decoder, HW+ is the second best, then Hardware, and if you have a slow connection, you can try SW. Buffer settings are pretty simple, you can choose 1 through 4, 1 being the smallest, and 4 the largest buffer size.
Overview
Kodi is an open-source media player which is a free application that functions as a digital media center. This application enables you to play your media, cast it between various devices, from a primary location to other devices.
Download KODI (Krypton)
Download and install KODI from this link
1.Click on “Add-ons“.
Choose Add-ons.
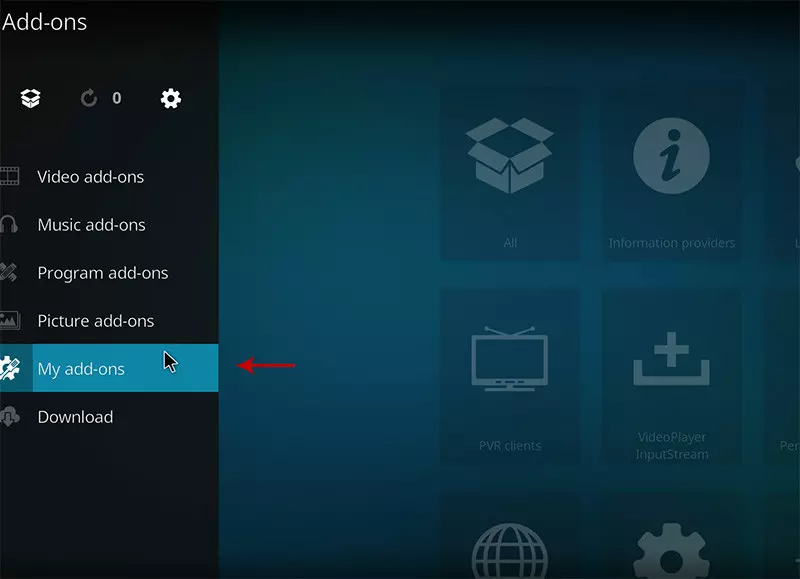
2.Now click on “My Add-ons“.
Press My Add-ons to select and customize required Add-on
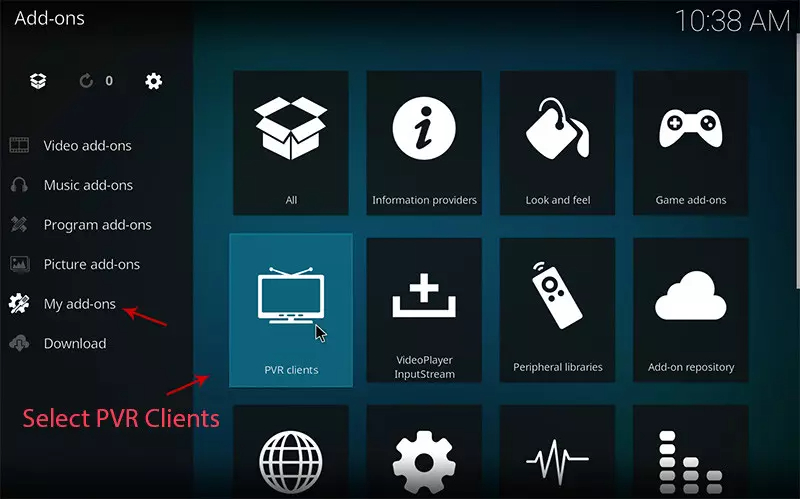
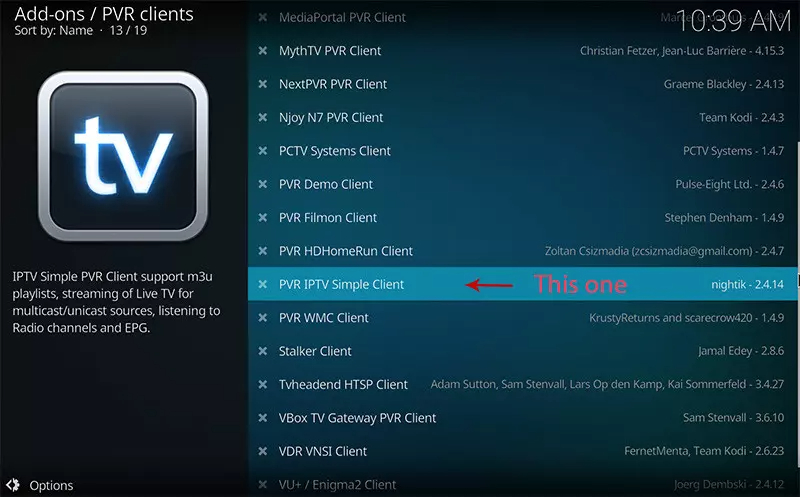
3.Select “PVR clients“.
Select PVR clients where in image shows.
4.Select “PVR IPTV Simple Client“.
There are other add on from third parties in Kodi to load IPTV Channels , But PVR IPTV simple client is one of default add ons.
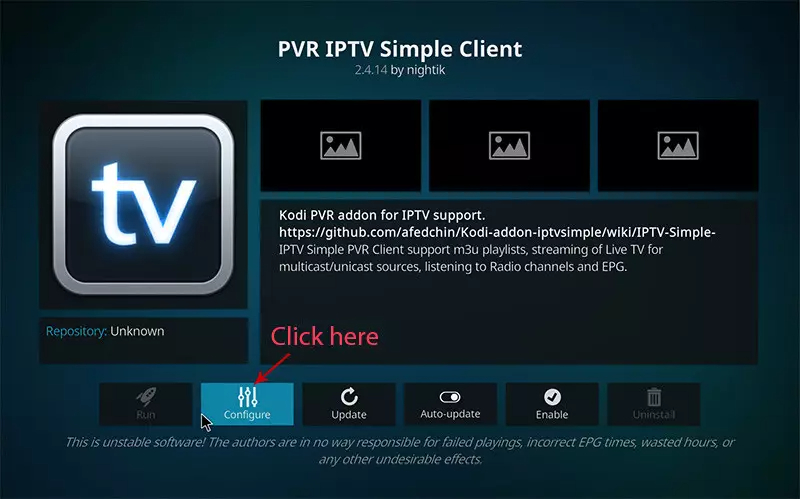
5.Click on “Configure“.
Click on Configure , we need enter IPTV details
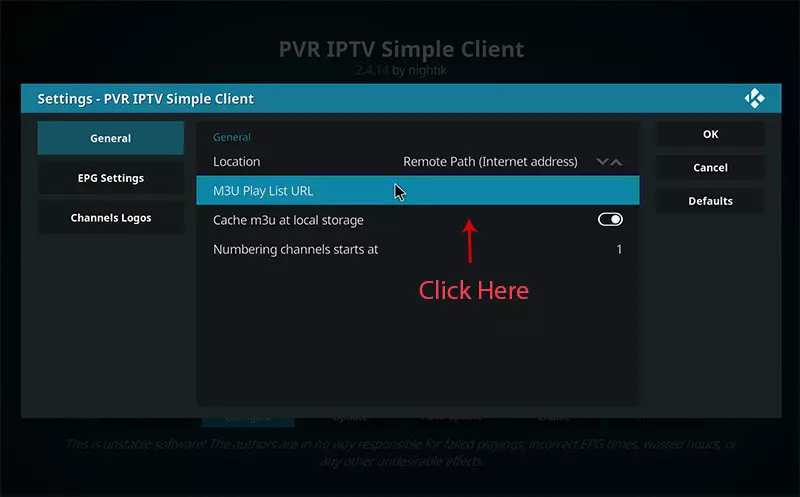
6.Select “M3U Play List URL“.
You can choose saved m3u file too in Location , But its better to Enter M3u list URL to have allways updated list .
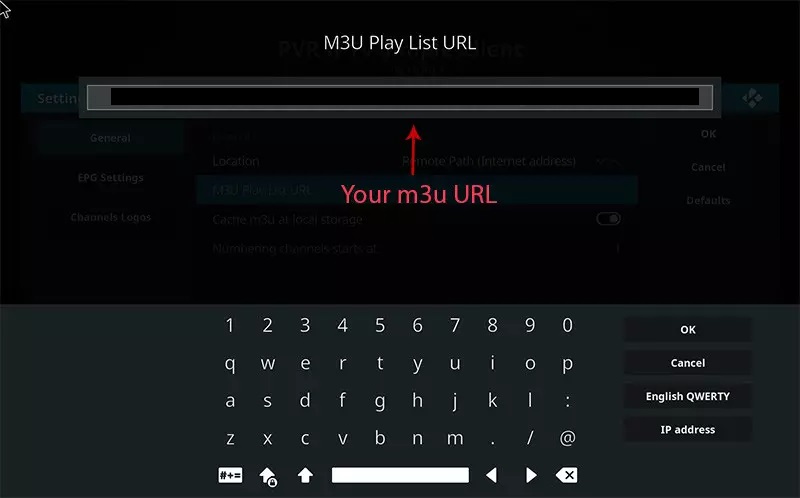
7.Now paste your M3U URL.
Paste the m3u link you got from your IPTV provider .
8.Now click on “XMLTV URL” for install EPG
click on “XMLTV URL” for install EPG URL.
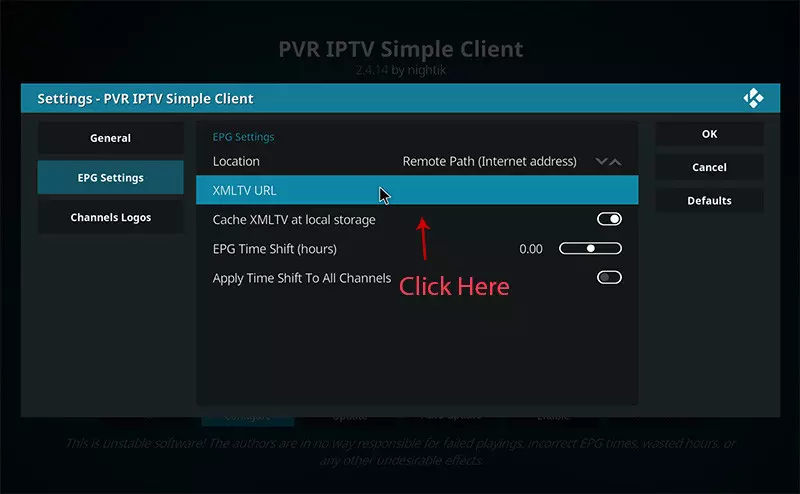
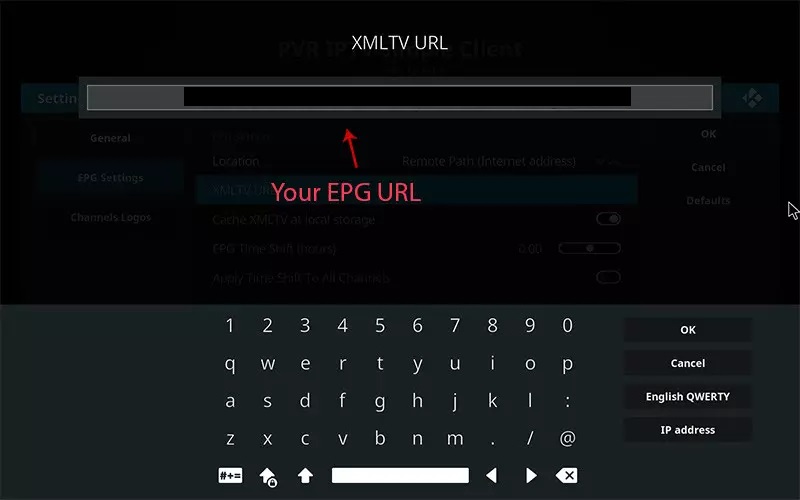
9.Now paste your EPG URL.
EPG URL can found in your subscription details
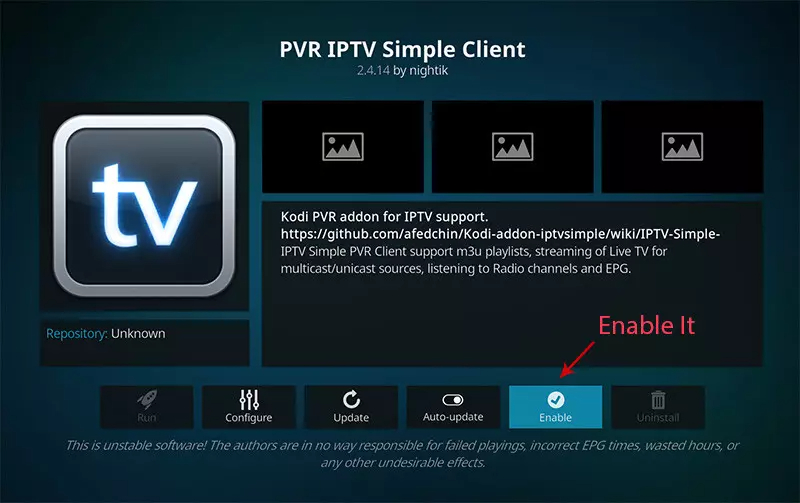
10.Click on “Enable“.
Enable PVR IPTV simple Client .
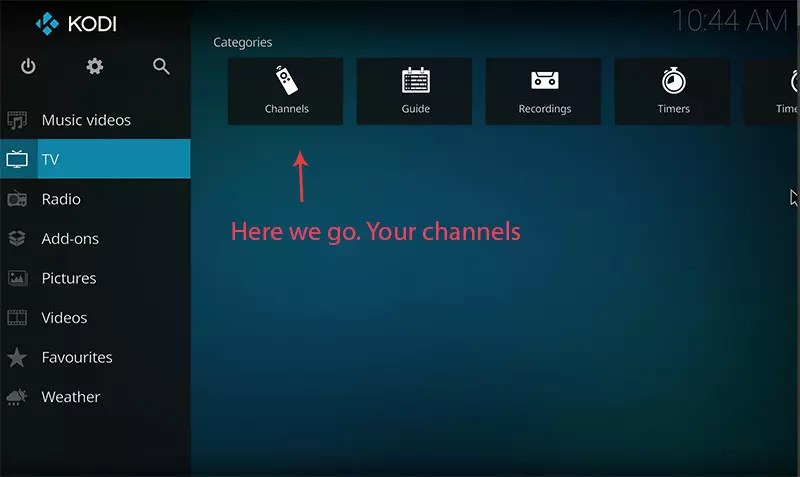
11.Now click on “Channels“.
Click on Channels to see Channels and groups list.
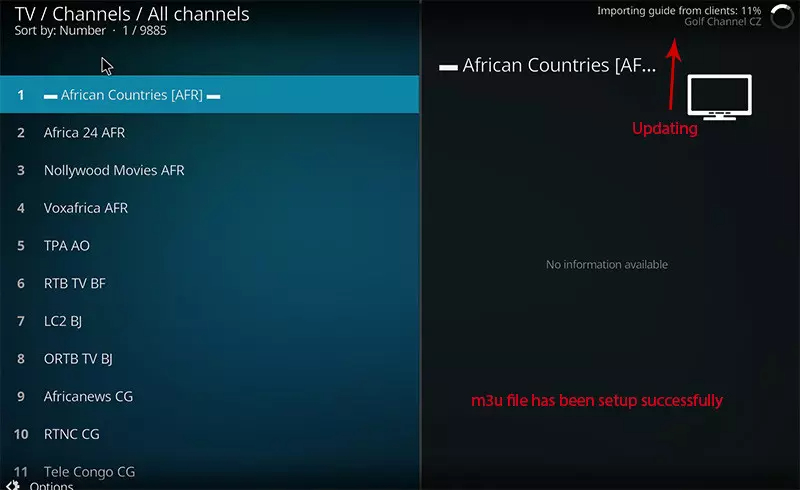
12.Load channels
Wait until you see the notification about updating channels and the installation process is over.
Overviw
Smart STB is a MAC address based app which can be installed on Samsung and LG smart tv`s, and android TV. This app enables you to have IPTV service on a portal just like MAG setup boxes with all characteristics that can be expected from MAG and Stalker Portal.
Note: For the beginning, the App offers you a 7-day free trial. After the App expires, you can obtain it again website billing system.
Installing Smart STB
Time needed: 9 minutes.
Install smart stb application
Install and find MAC address.
From the app market on your smart tv search, find and install Smart STB App.
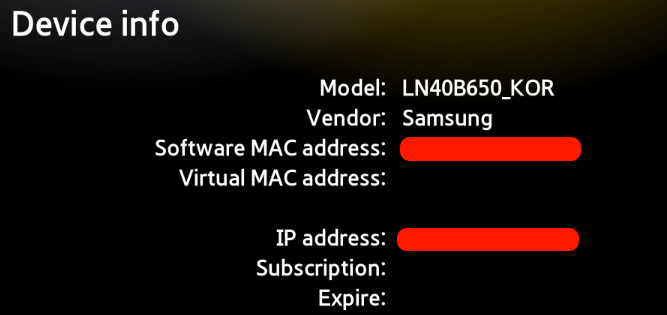
After that, we can initiate the time for testing. To do that we first need to discover the Software MAC Address which is required for application activation on Smart-STB site.
Find Mac address: To find mac address navigate to Device Info > Device Info . There are two mac address type :
Software MAC address which is required for app activation on Smart-STB website.
Virtual MAC address which is required for IPTV service activation on your IPTV provider server. You need assign this mac address on your subscription dashboard . (there is more info in FAQs)
2.Active 7 days free trial
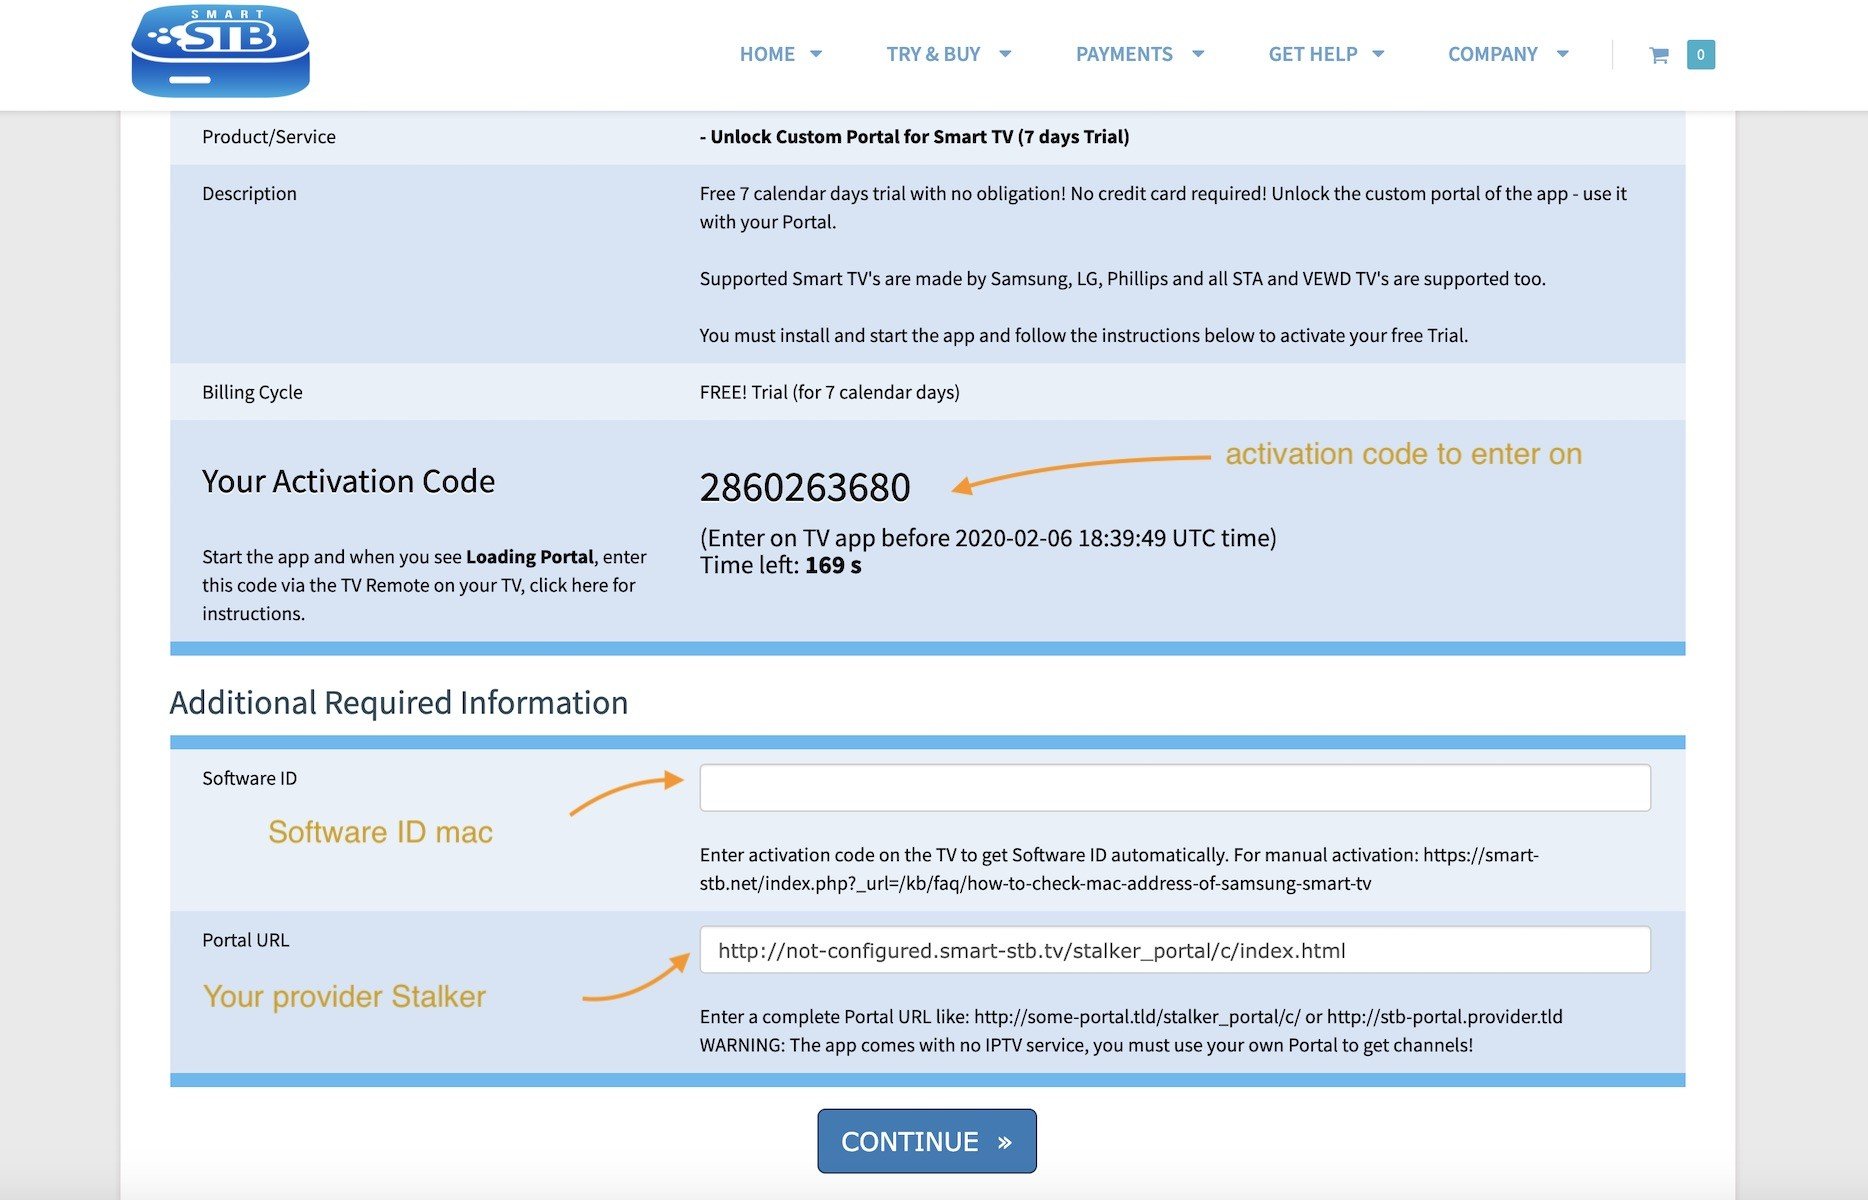
Now that we understand the needed MAC address info, it is time to activate the app trial period. First, log onto the trial activation page of Smart-STB website by opening this URL https://smart-stb.net/index.php?_url=/order/unlock-custom-portal-for-smart-tv
You need enter Software MAC address , Your server stalker portal address. (there is more info in FAQs)
Then continue .
3.Sign up
If you implement the correct information and add the correct Mac address, the MAC address Valid message in the green text should show up.
You require to register on their website eventually. So if you have not registered at the moment, we recommend that you do.
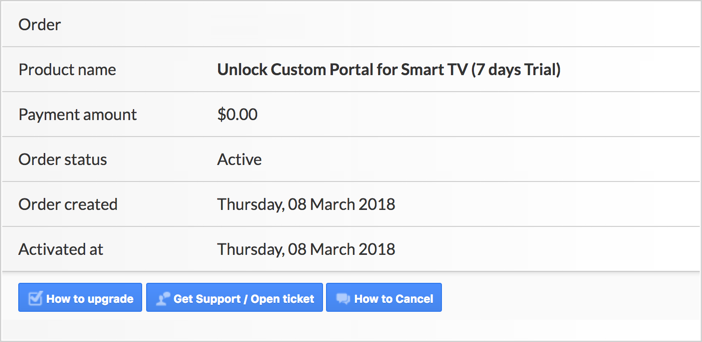
After registering and login , checkout step with 0 price , finish this step .
Now as you can see, Order Status is set as Active meaning the trial period has started.
Now if you head back to the “Device Details” page of the app on your TV where we previously visited, you`ll see the trial has started and an expiry date is indicated
Activation of the paid licenses
Considering that Software MAC address and account registration on the Smart-STB side has already been done, upgrading to a paid license is very simple and easy.
Log onto the smart-STB website and log into your account: https://billing.smart-stb.net/clientarea.php?action=services
From the left menu, click on “Services“. The free 7 days trial we activated earlier is listed. Now let`s add a paid license starting by clicking on “Order New Service“.
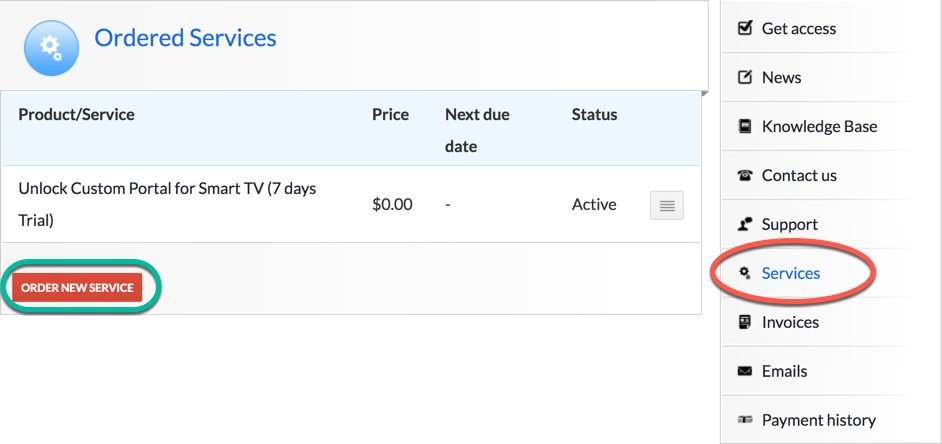
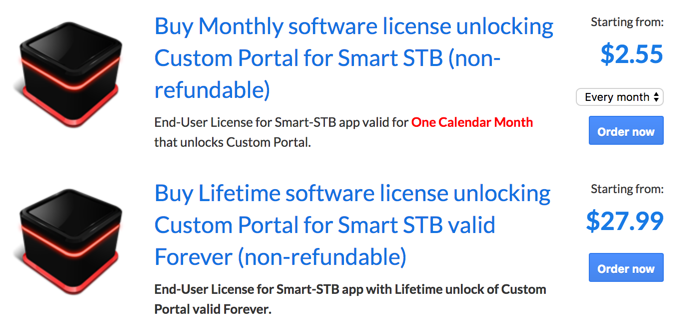
These are the following paid monthly and yearly licenses to which you can subscribe.
For example, if you subscribe to the lifetime package, the subscription status in device info page will change to Paid and expire to Never since it is a lifetime subscription.
Overview
Net IPTV application, is best alternative for smart IPTV , a new light developed app with good performance and player codec . the app available for All SAMSUN TV from 2016 (Tizen OS) and LG (WebOS 1 , 2 and 3 ). App developer website announced coming soon for WebOS 3.5 , 4.0 and 4.5 . and available for all android devices ,TVs with android platform and Fire TV stick (from PlayStore and Direct download link ).
Download NET IPTV
Android devices with play store : You can download it at Android App Store or Google Play Store
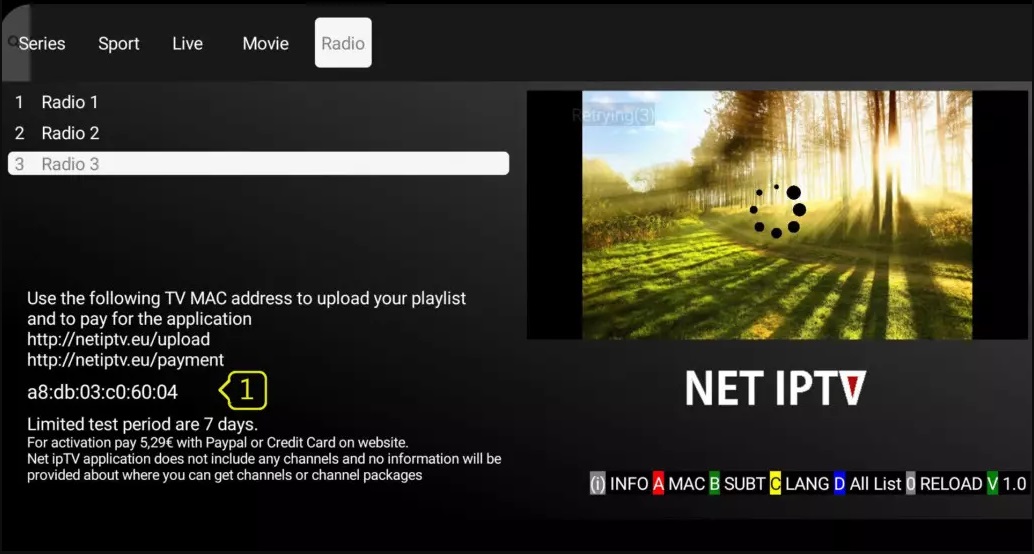
Note: For the beginning, the App offers you a 7-day free trial. After the App expires, you can obtain it again via portal (5.29 euro): https://netiptv.eu/Payment
Install IPTV subscription on NET IPTV
Time needed: 8 minutes.
Find Mac address
Open application and you can see the MAC address , If not , navigate to info ( by pressing RED button usually )
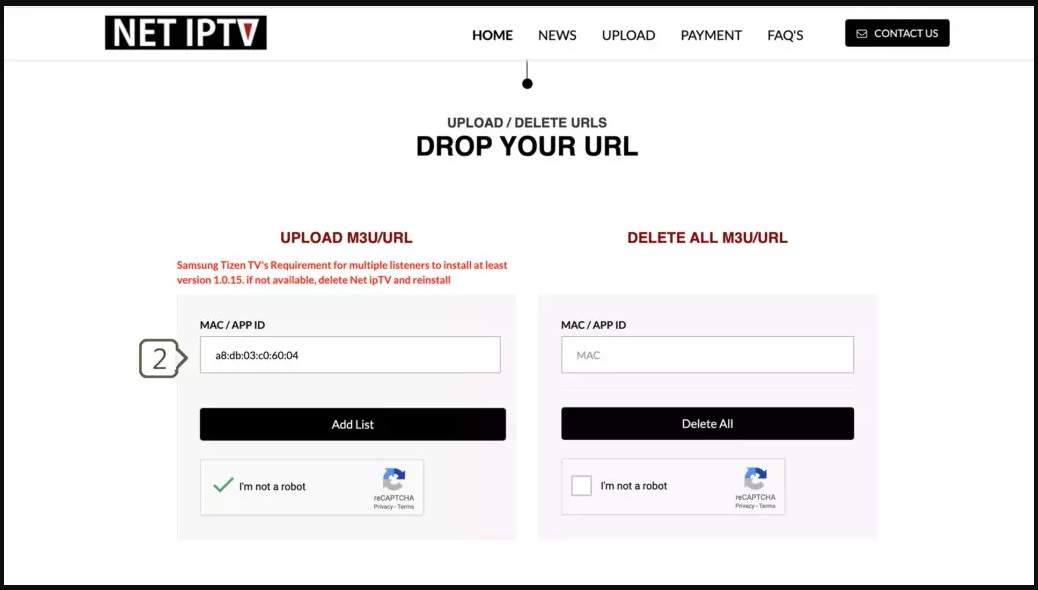
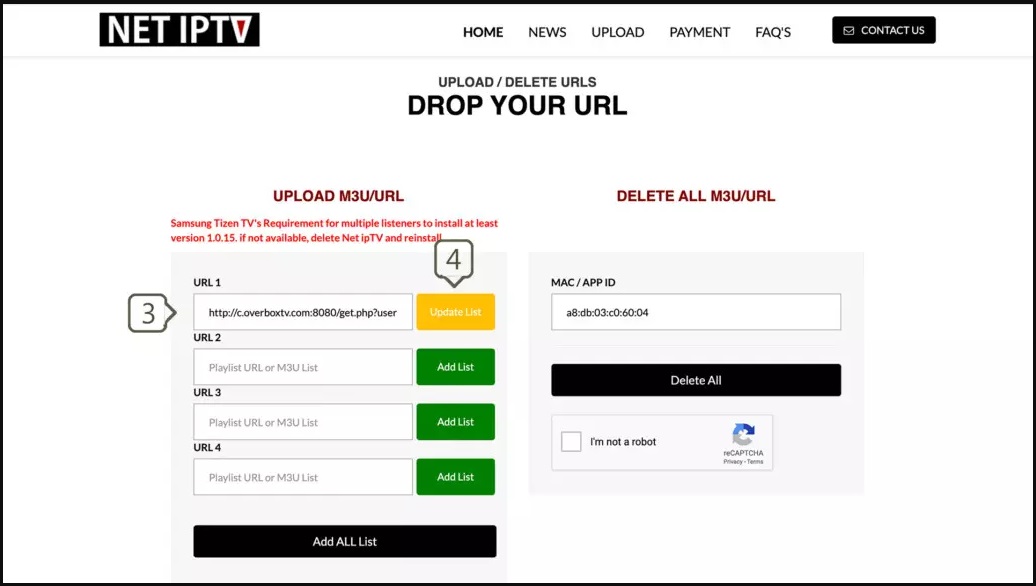
2.Upload M3u link via portal
Open app upload page via browser : http://netiptv.eu/Upload
Enter your mac address in MAC / APP ID field under UPLOAD m3U/URL row, Then press Add List
3.Enter m3u link and update
Enter The m3u link you received from provider in URL1 field
Click Update List
Done
You need back to net IPTV app and press number 0 on remote control to reload list.
Overview
Most advanced , Easy to use , smooth and modern graphic interface IPTV for big screen android devices (Android TV). This app stay in number 1 within android IPTV application. The problem is VOD doesn’t support by the app.
Most important feature are:
• Modern user interface designed for big screens
• Support for multiple playlists
• Scheduled TV guide update
• Favorite channels
• Catch-up
• Support Subtitle
• Record programs
Download and Install
TiviMate available for android platform devices like Android TV, Amazon fire TV stick. the limited free version available in play store. Premium version cost 99 USD (one time) or 25 USD per year . But we provide you the premium unlocked version APK for download and install .
Free version : https://play.google.com/store/apps/details?id=ar.tvplayer.tv
Download Premium version : https://install-iptv.com/tivimate
Setup IPTV playlist in TiviMate
Install TV channels on TiviMate
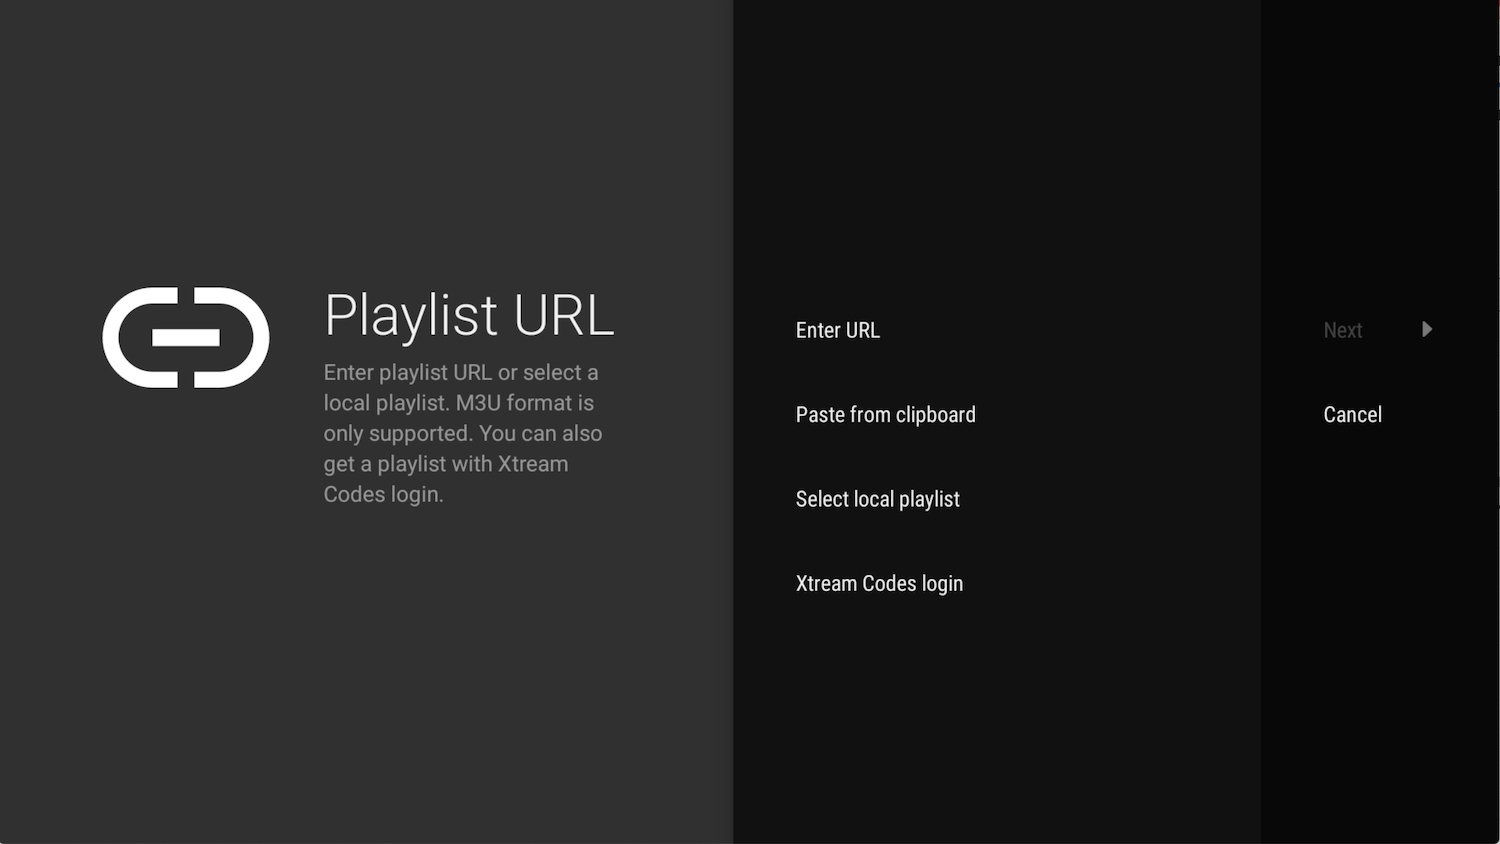
1- Add playlist
After install IPTV open it and select ADD PLAYLIST.
You able to add playlist in every method like download m3u link (local playlist), Remote playlist (Enter URL) and Xtream Code Login . We recommend to connect as Xtream Code method .
2.Enter Xtream Codes details
choose Xtream Codes login and enter Xtream connection details which IPTV provider must provided to you . Then choose next.

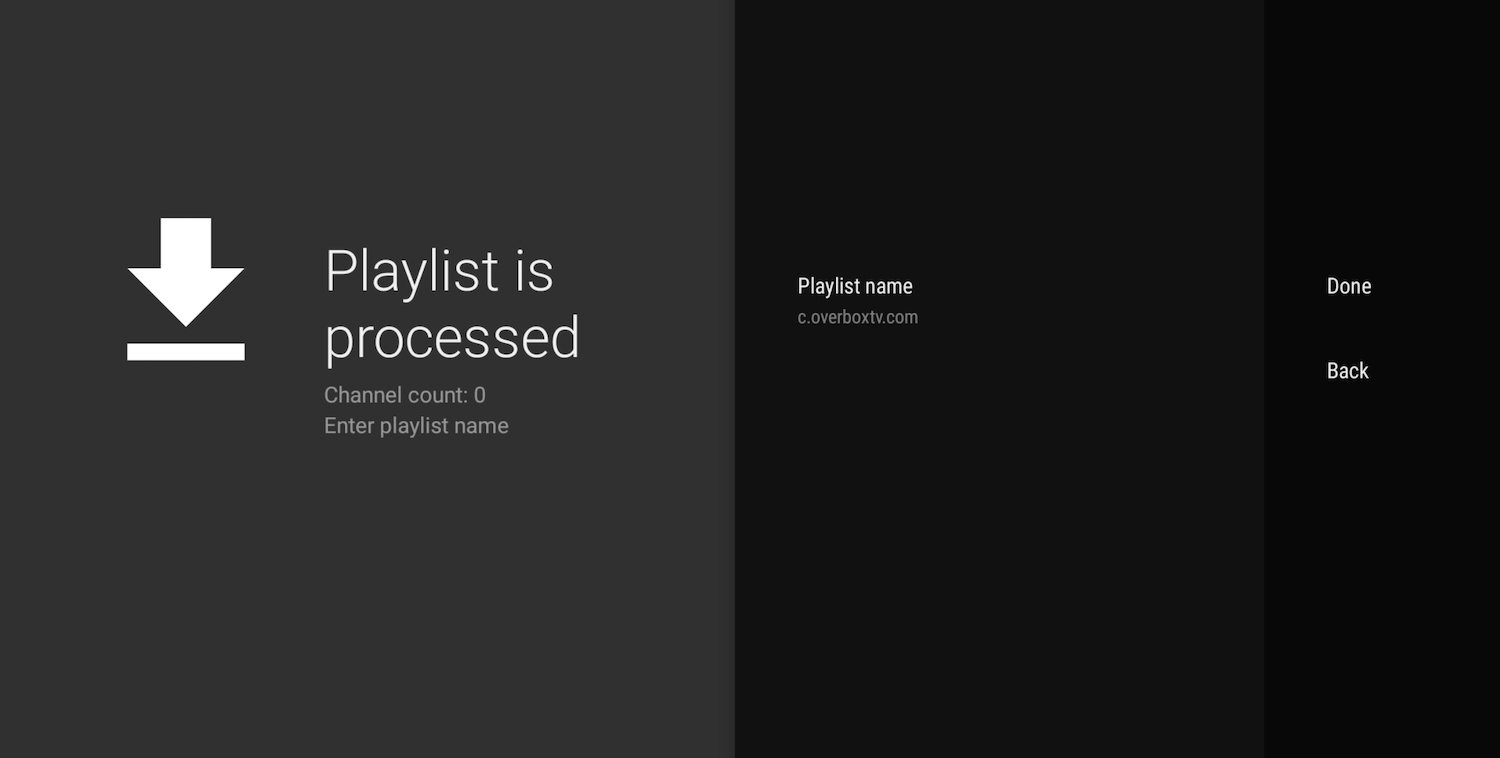
3.Choose a name for playlist
TiviMate choose server domain for playlist name automatically. You can change it to every name you want then choose Done .
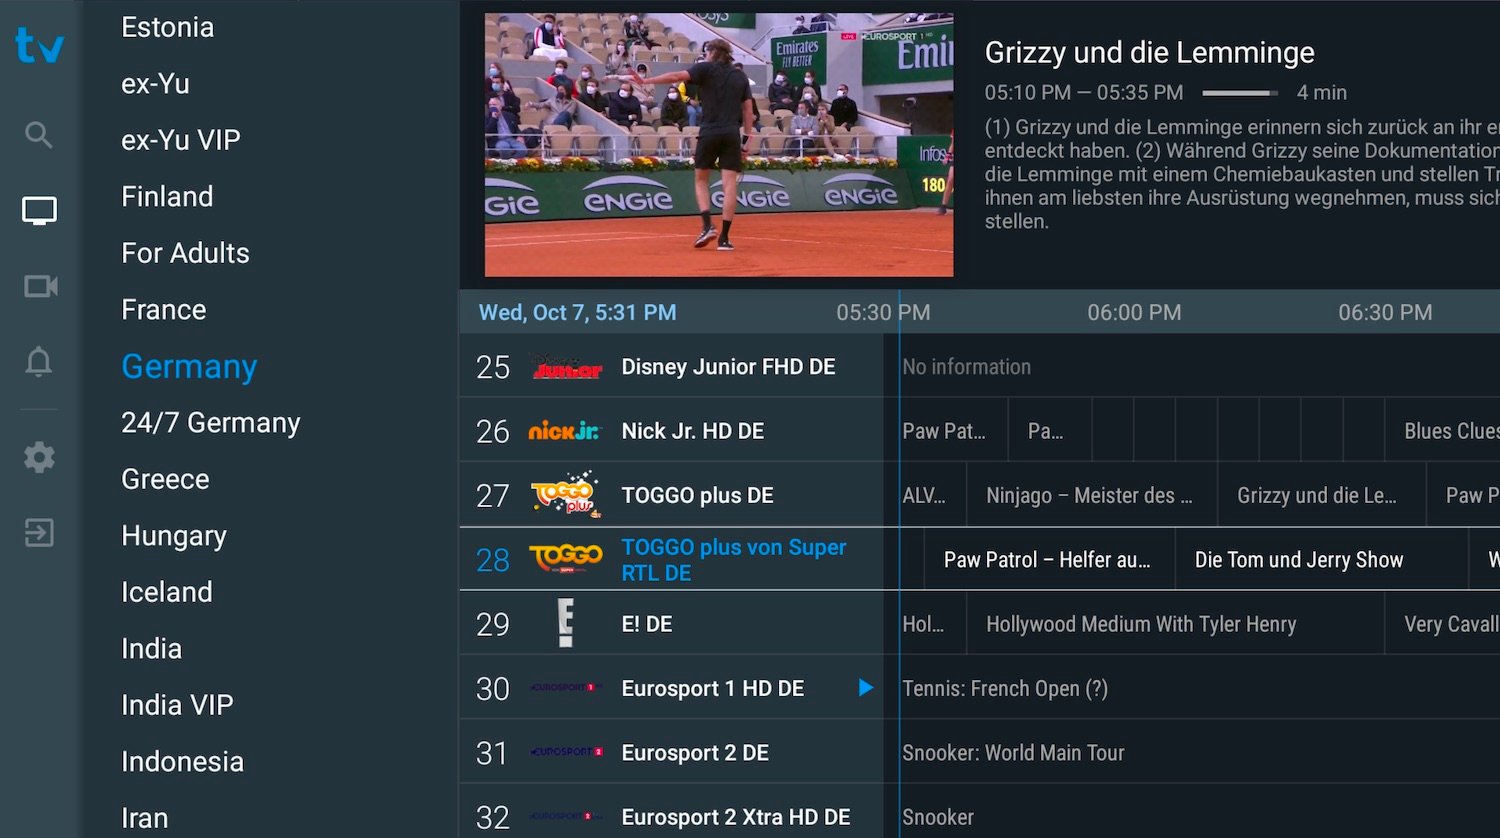
Application interface
Here some screenshots from TiviMate
How to install IPTV on STB Emu Android version?
Quick stream buffer, categorized and neat form of channel listing and many other features should be enough reason for anyone to use apps and devices which run based on Stalker Portal. STB Emulator (STB Emu in short) is yet another great app for those who love Stalker Portal.
This app can be installed on almost all devices which run based on android. It can be a Smart TV, an Android Box, Firestick or basically any device which has an app market. First we install the app, then we setup the IPTV service on it using Stalker Portal method. In this instance, we install this app on an Android Box.
-Installing STB Emu on an Android device like Smart TV, Amazon FireTV Stick, Android Box …
-Installing and configuring IPTV on STB Emu
-Installing STB Emu on Android device
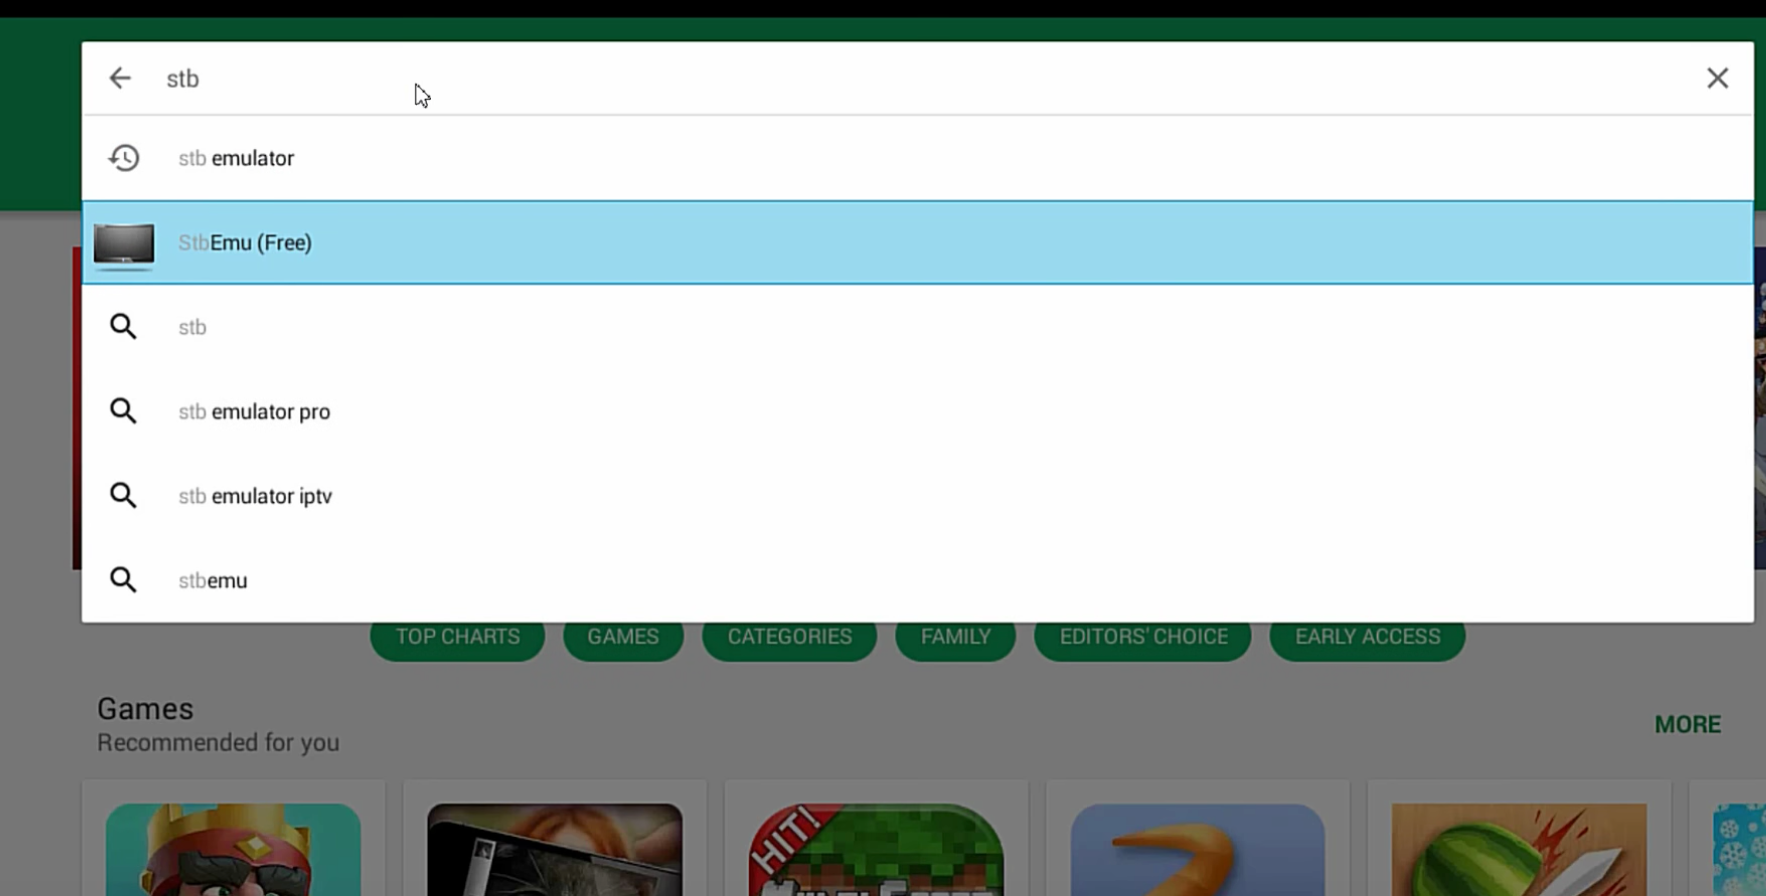
1-First step would be finding and installing the app. So open up PlayStore on your android box and in search area typeSTB Emu. Select the one as shown above.
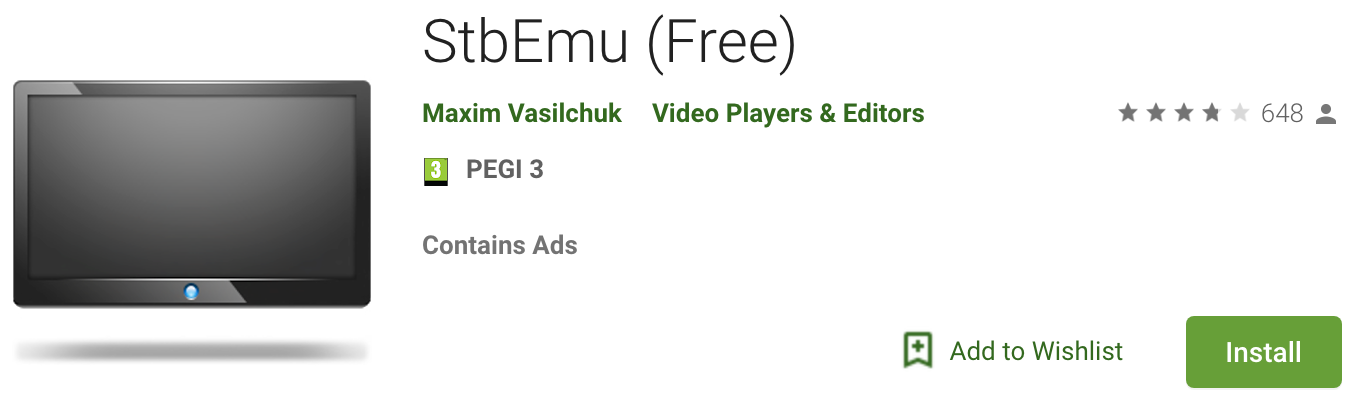
2-This is how the app should look like on your PlayStore. Creator should show as Maxim Vasilchuk.
Note: As you can see above, it is a Free app. It is also mentioned that it contains Ads. Pro version of this app is very much the same except for two things: 1-No Ads, although no Ads have bugged anyone on the free version 2-It enables you to use MAG App Control. This includes features like Play/Pause the stream, Fast forward, Keyboard search, On-screen display … . If you want those and willing to pay for it, you can go with Pro version.
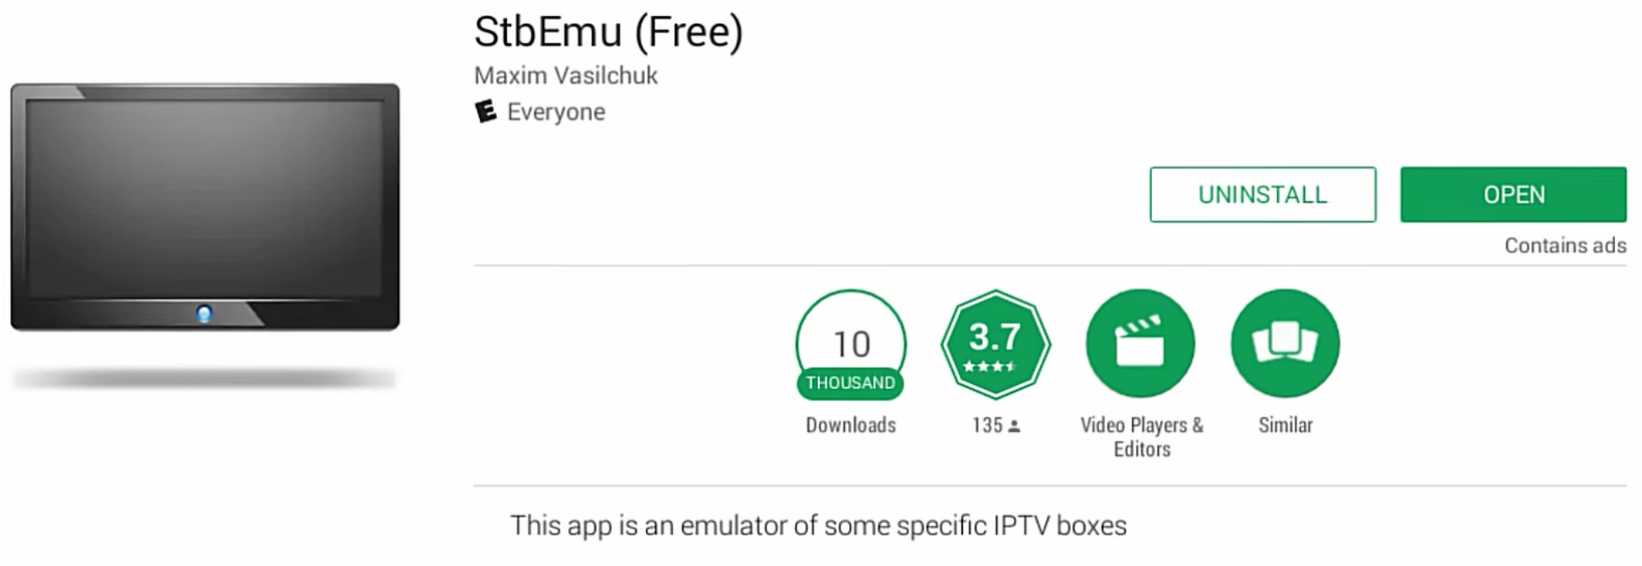
3-Ready, Open it now.
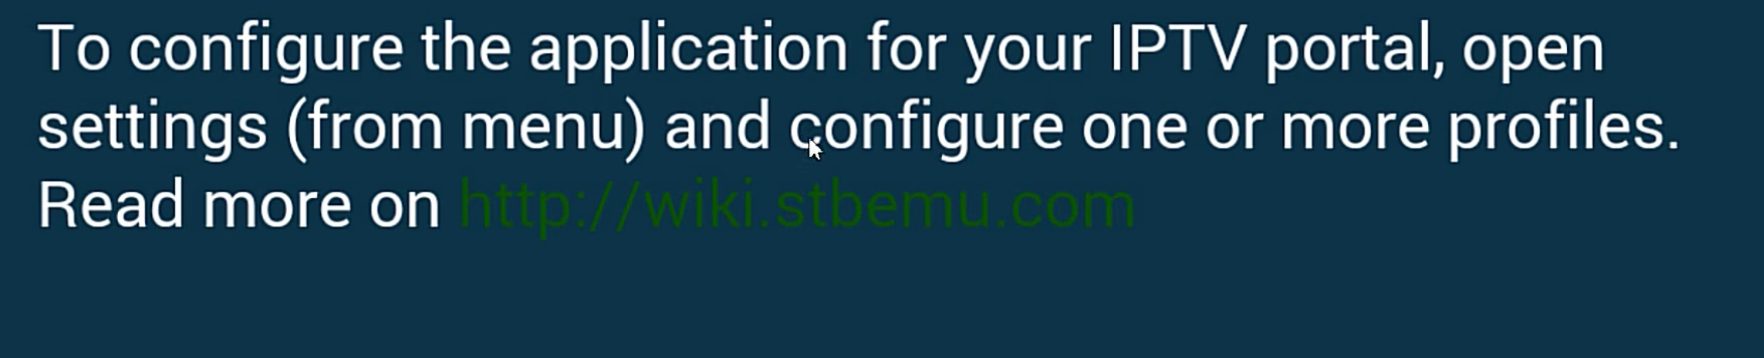
4-After opening the app for the first time, this message will pop up.
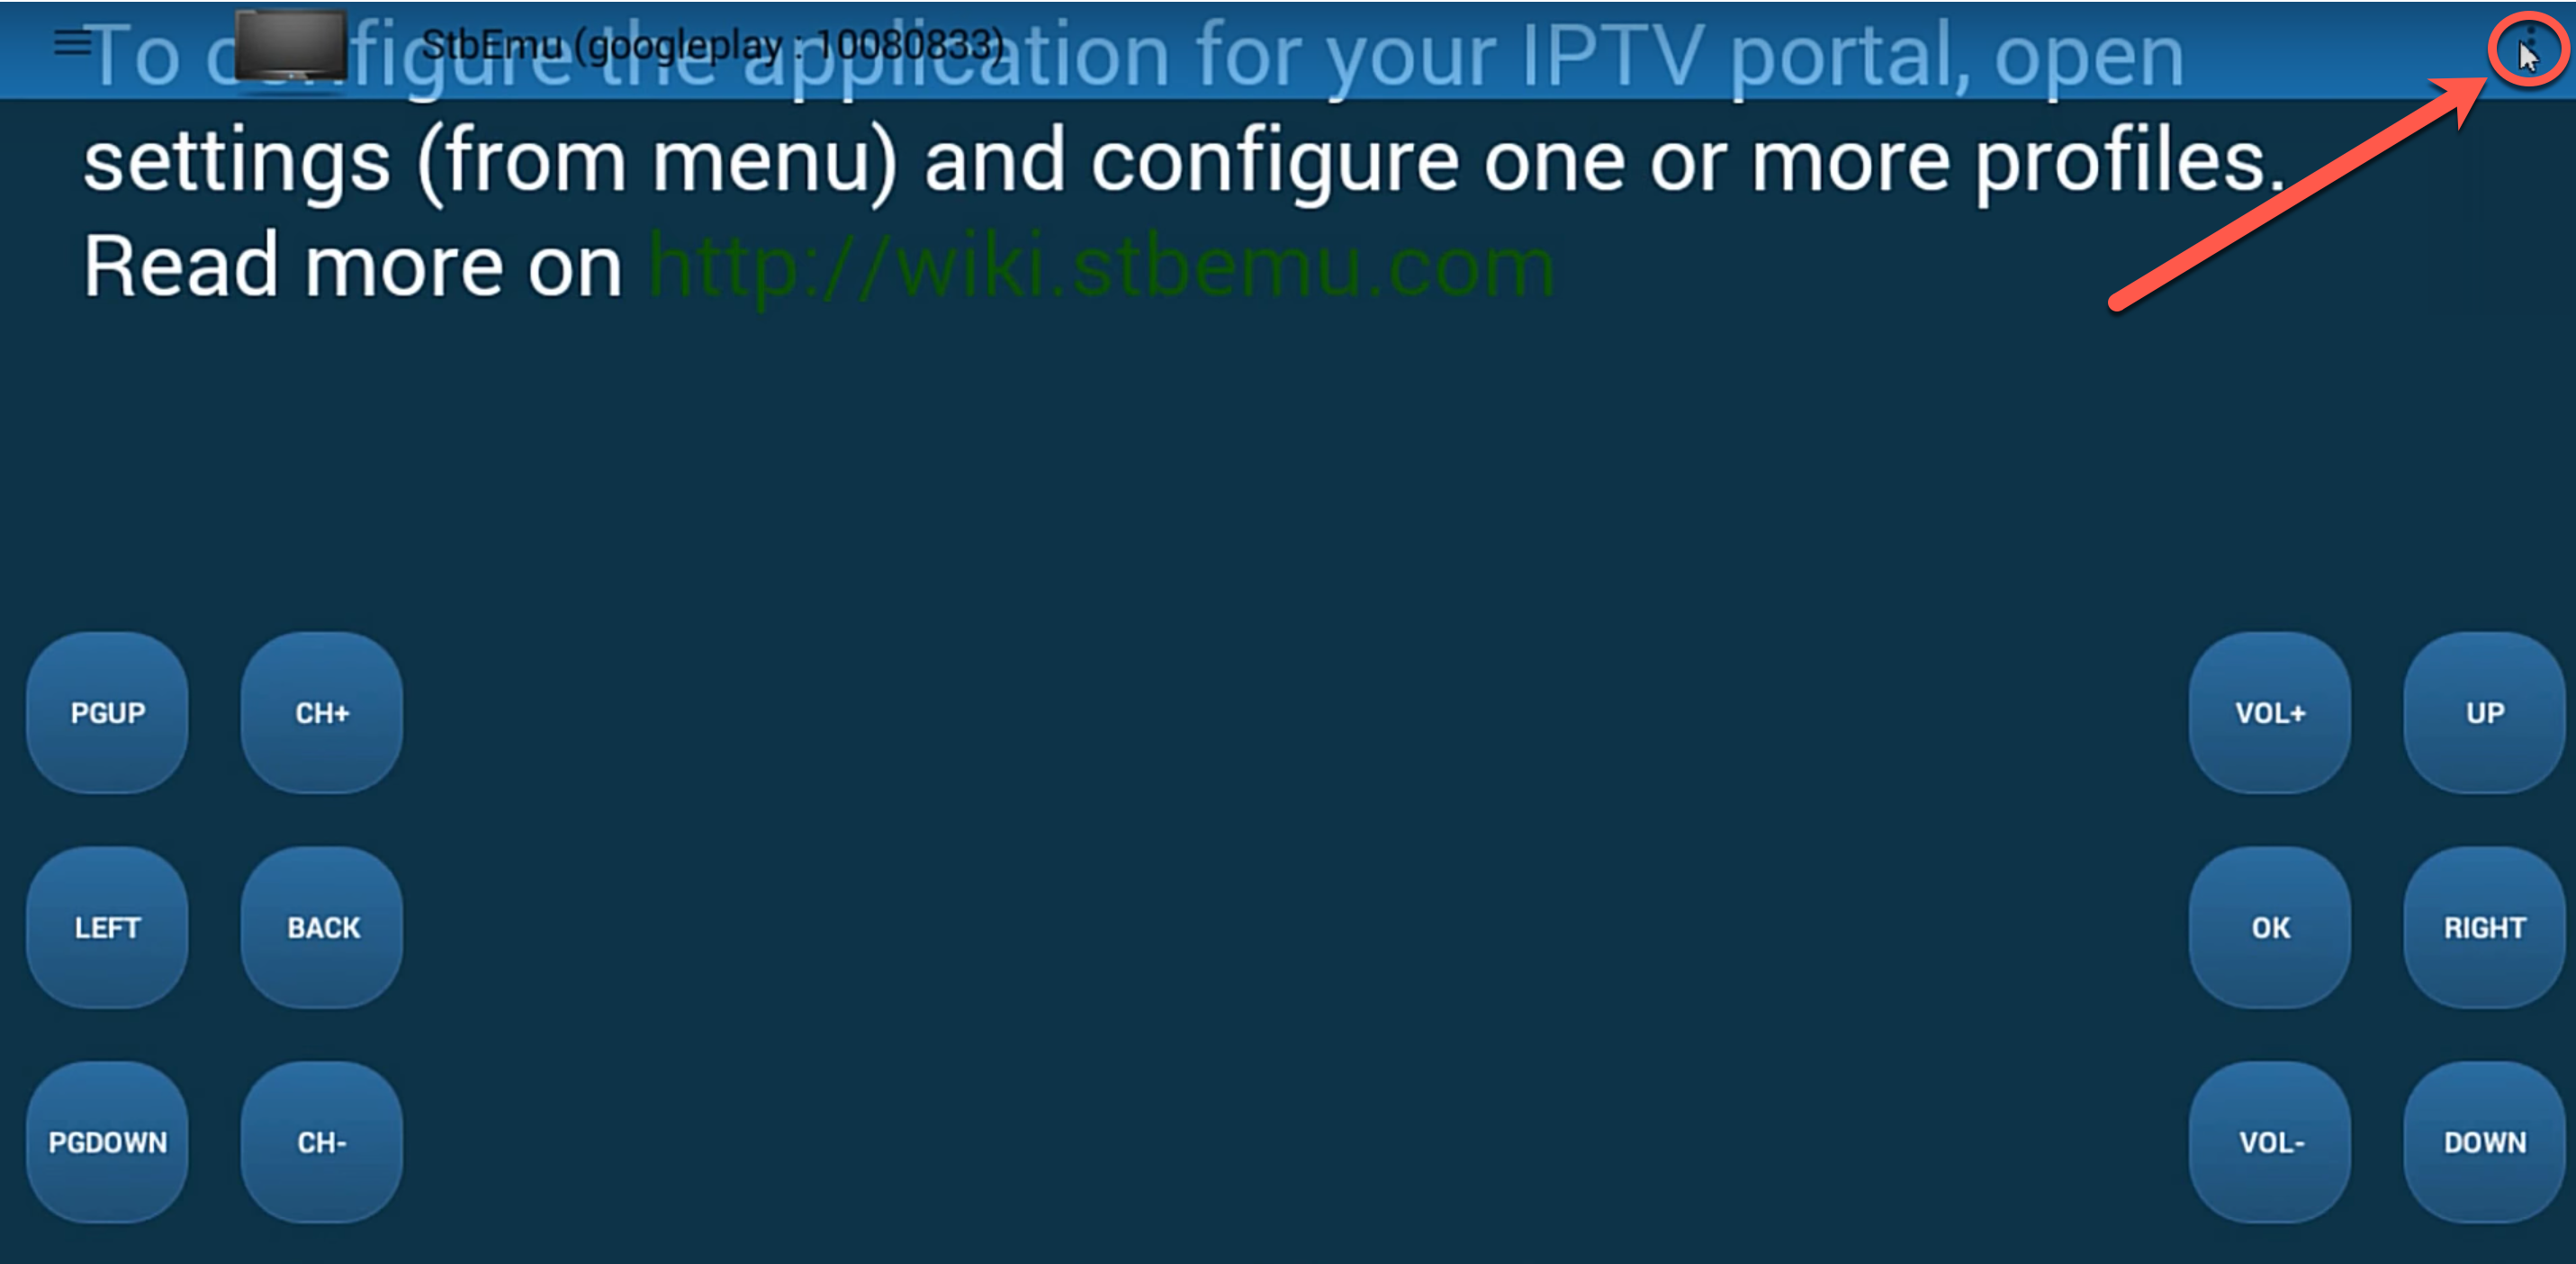
5-Click some where on the screen and control buttons will appear. Then from the top right. click on the drop down menu sign.
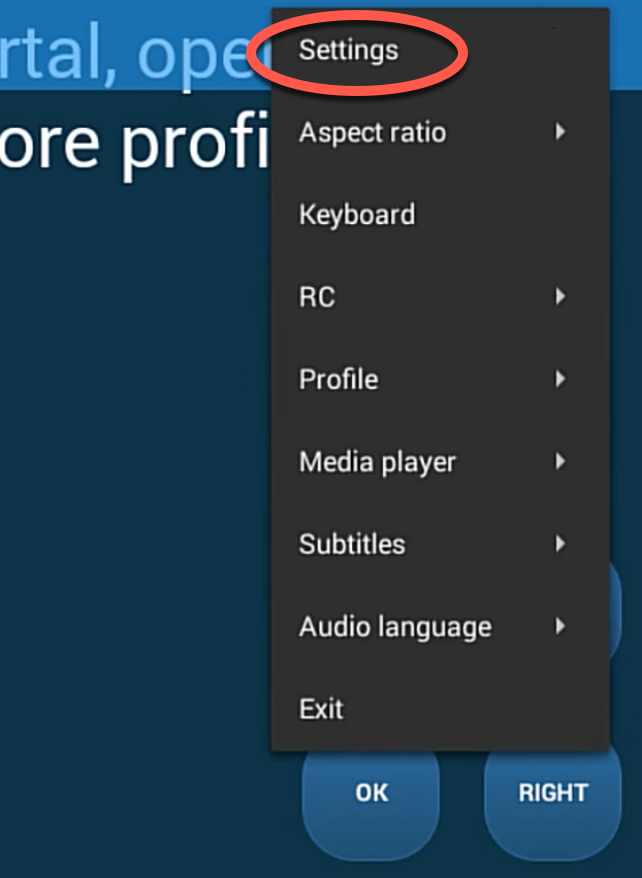
6-Click Settings.
-Installing and configuring IPTV on STB Emu
To complete this step, two things must be done:
-Finding our MAC address for Stalker Portal activation on IPTV Provider`s side
-Entering IPTV Provider`s Stalker Portal URL inside the app
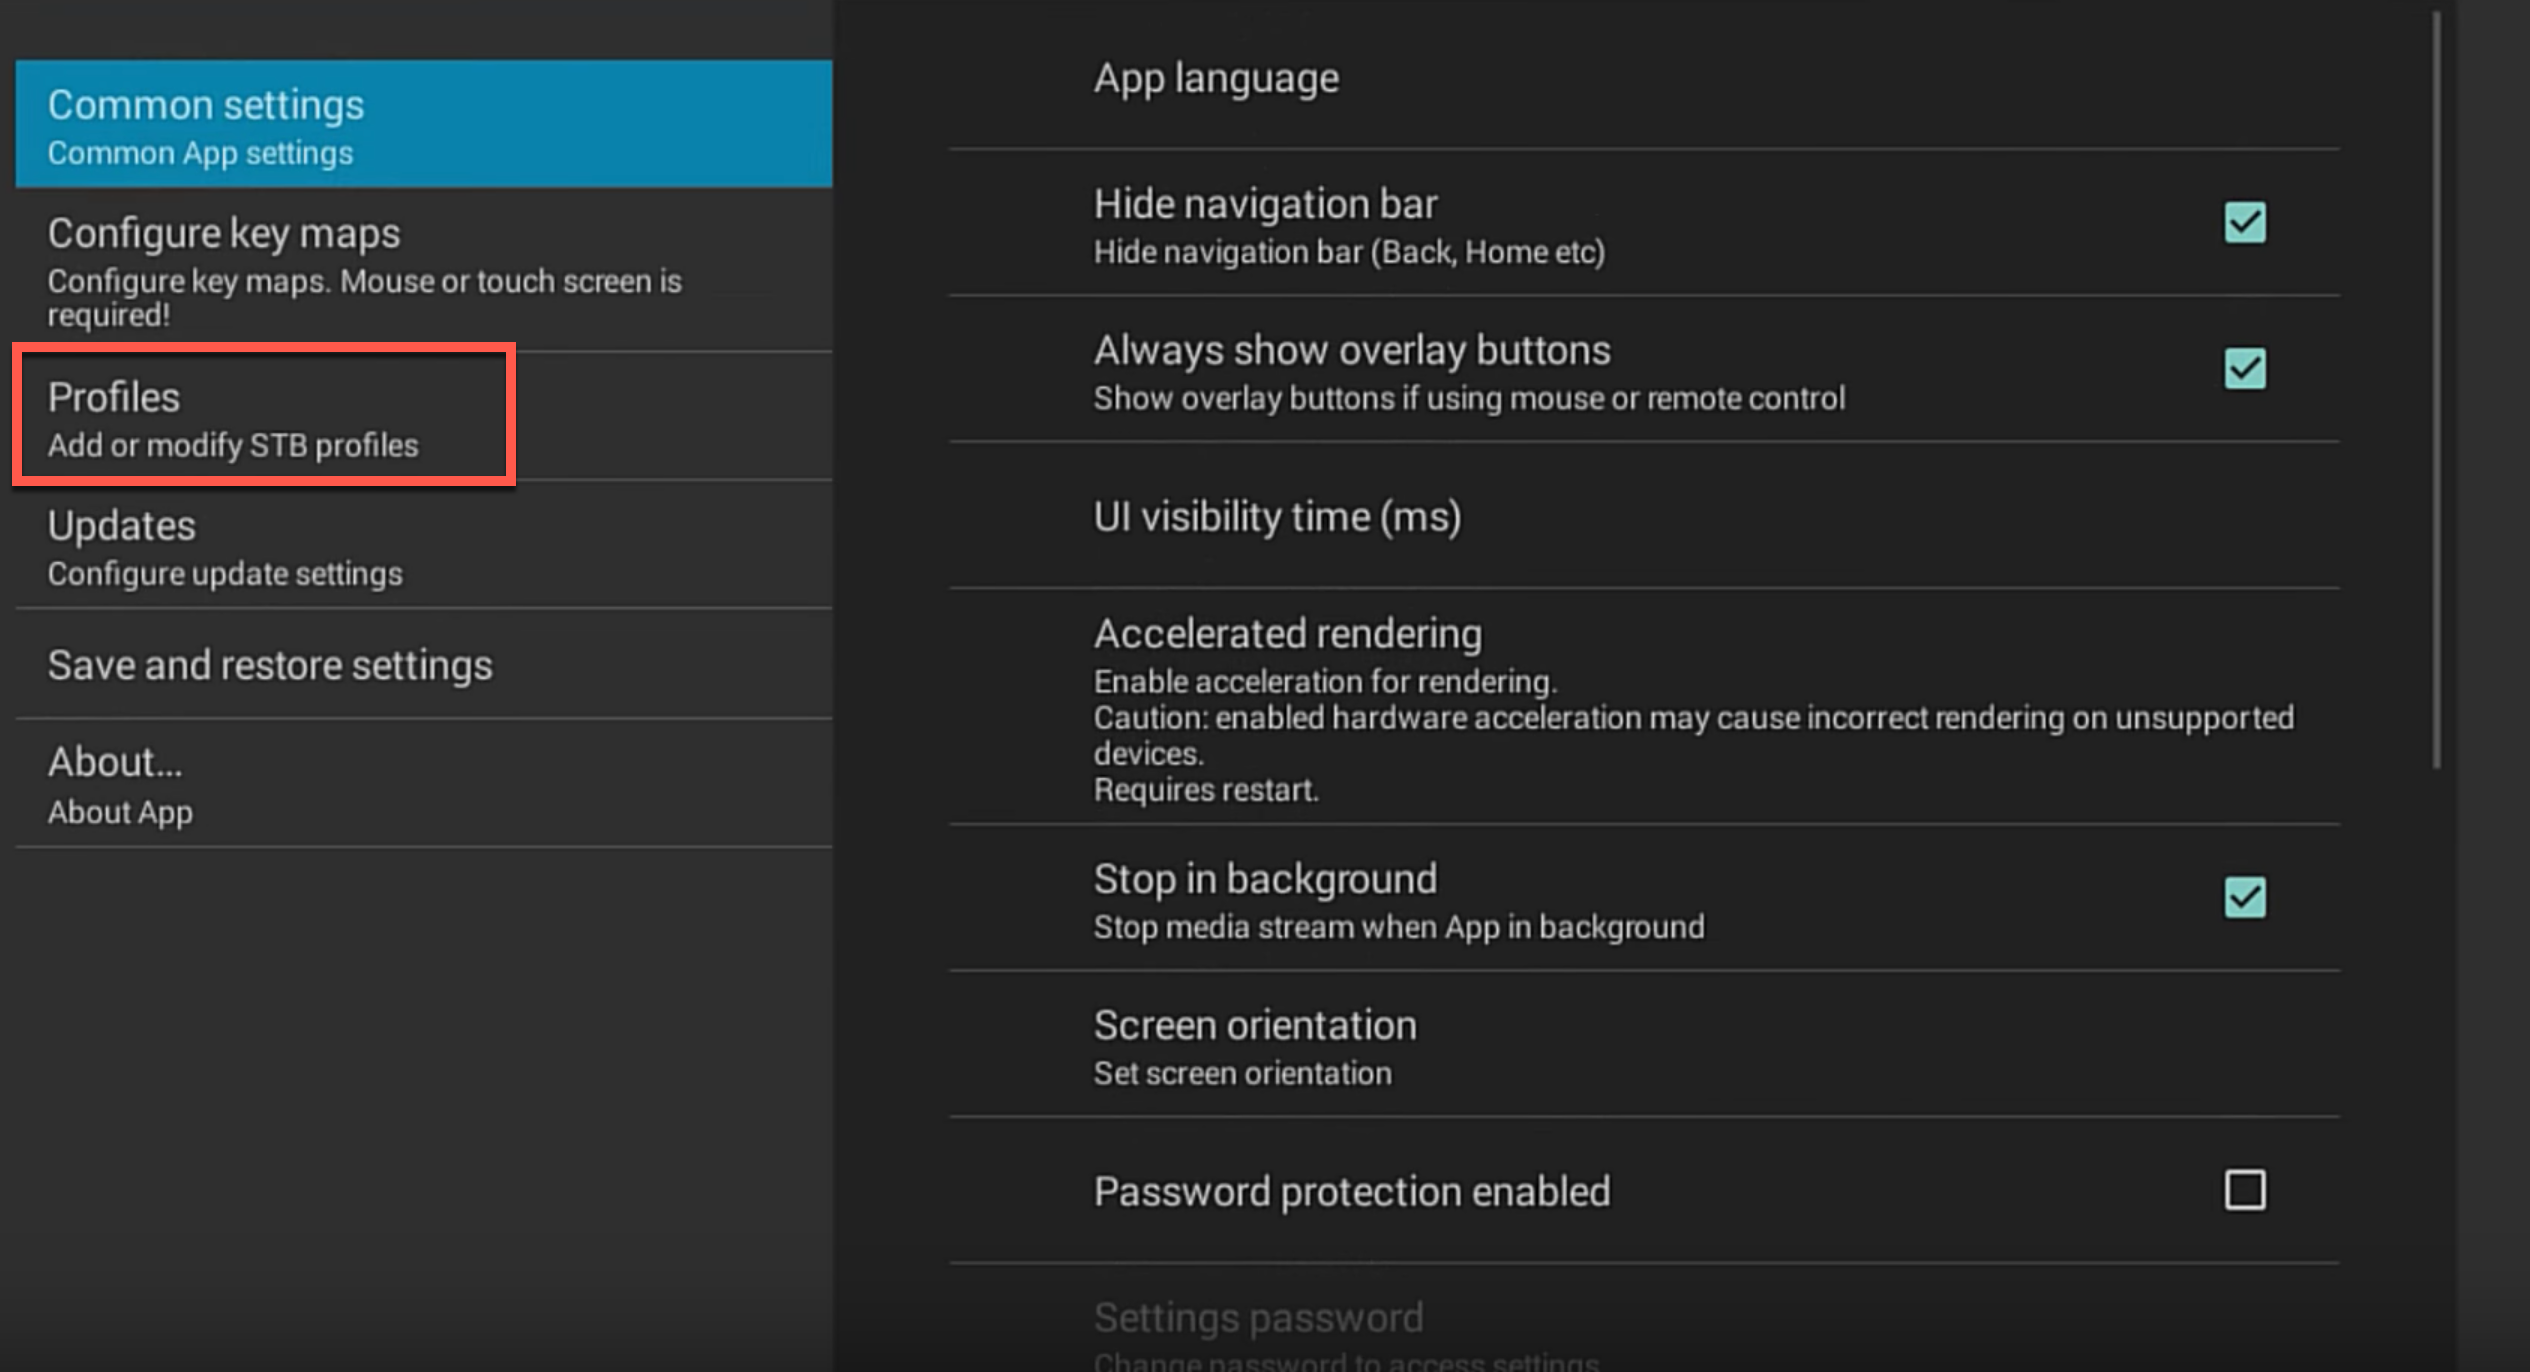
1-To configure STB settings, select Profiles.
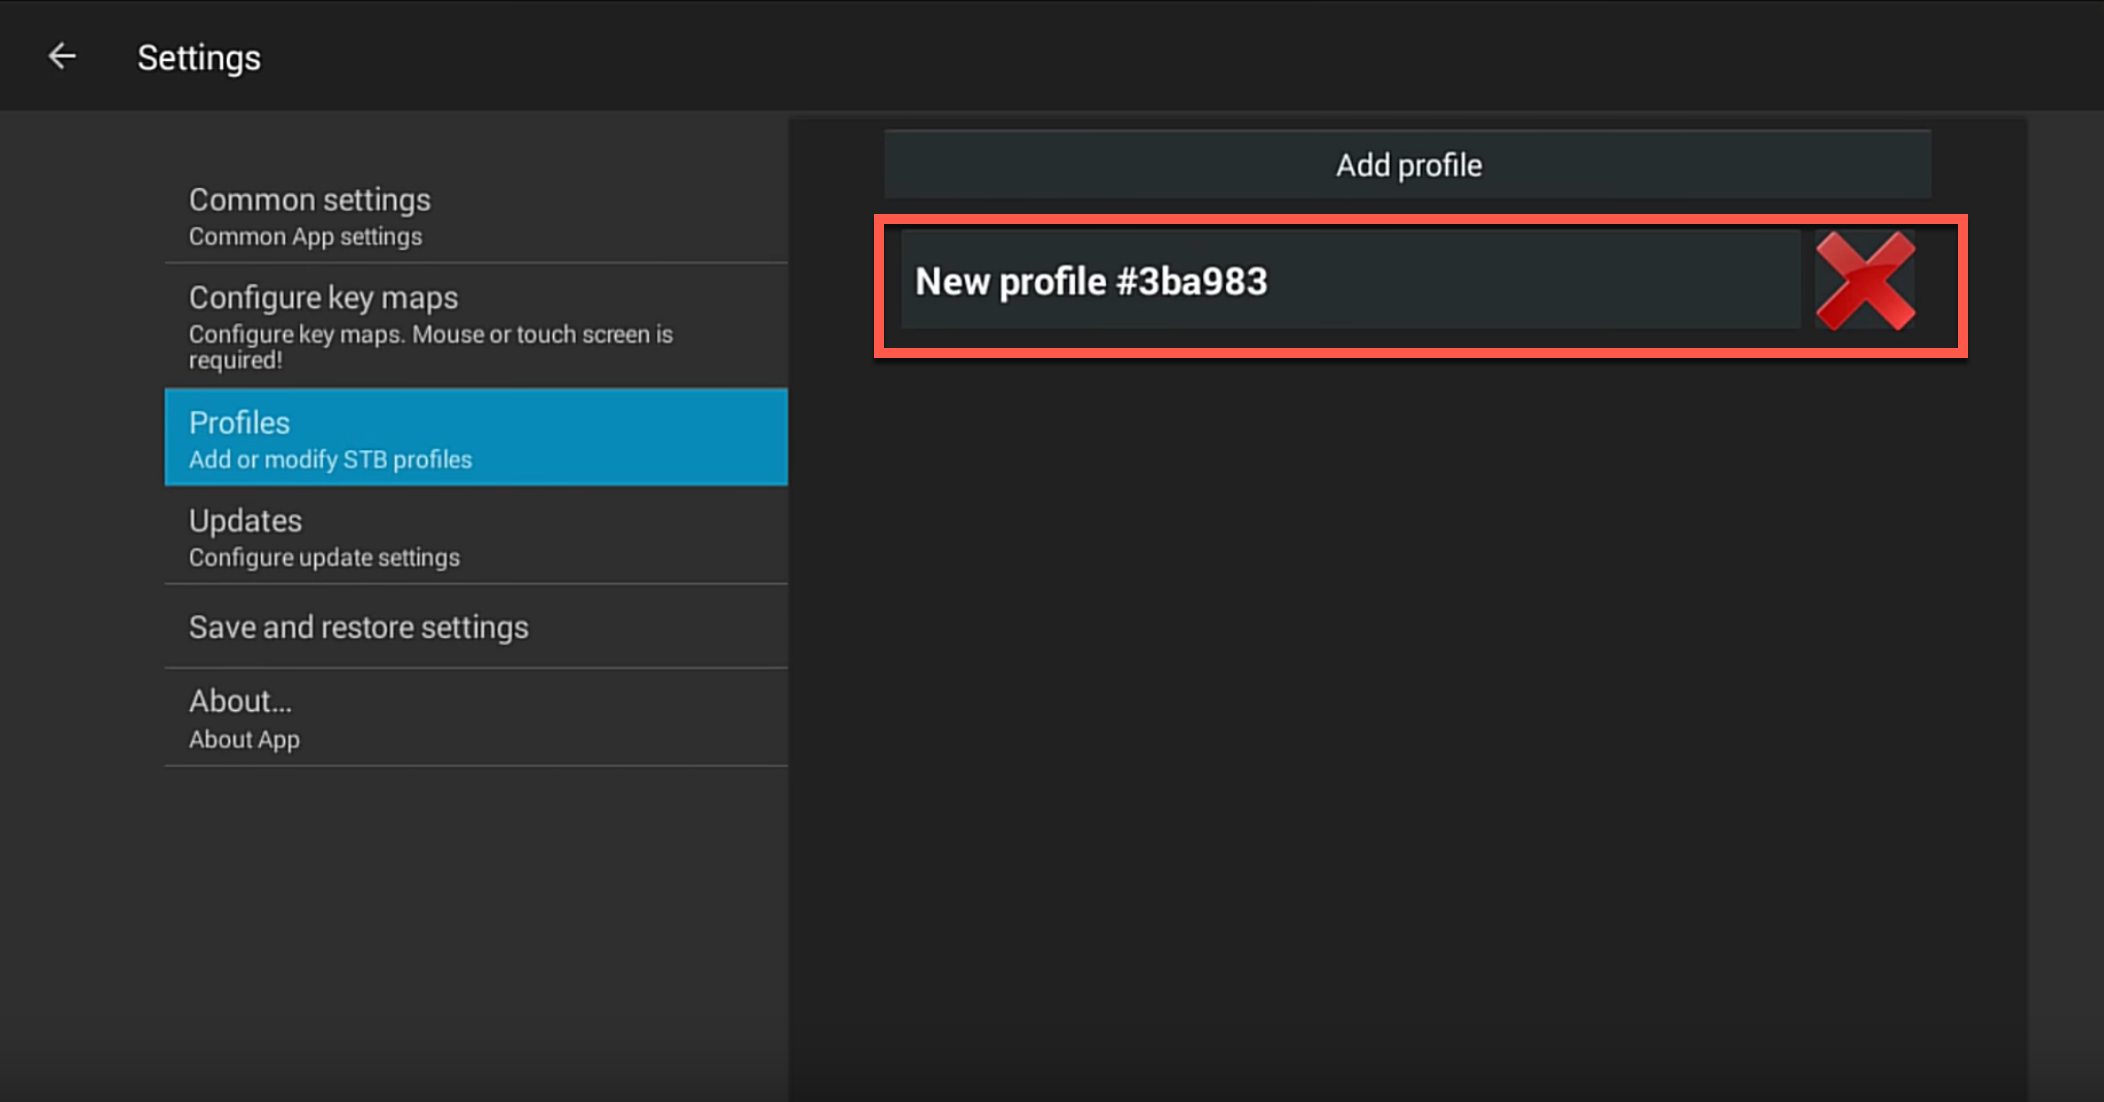
2-Select where says New Profile, shown in red.
You can either rename and reconfigure this profile or remove and add new one. In this instance, we simply edit the default profile.
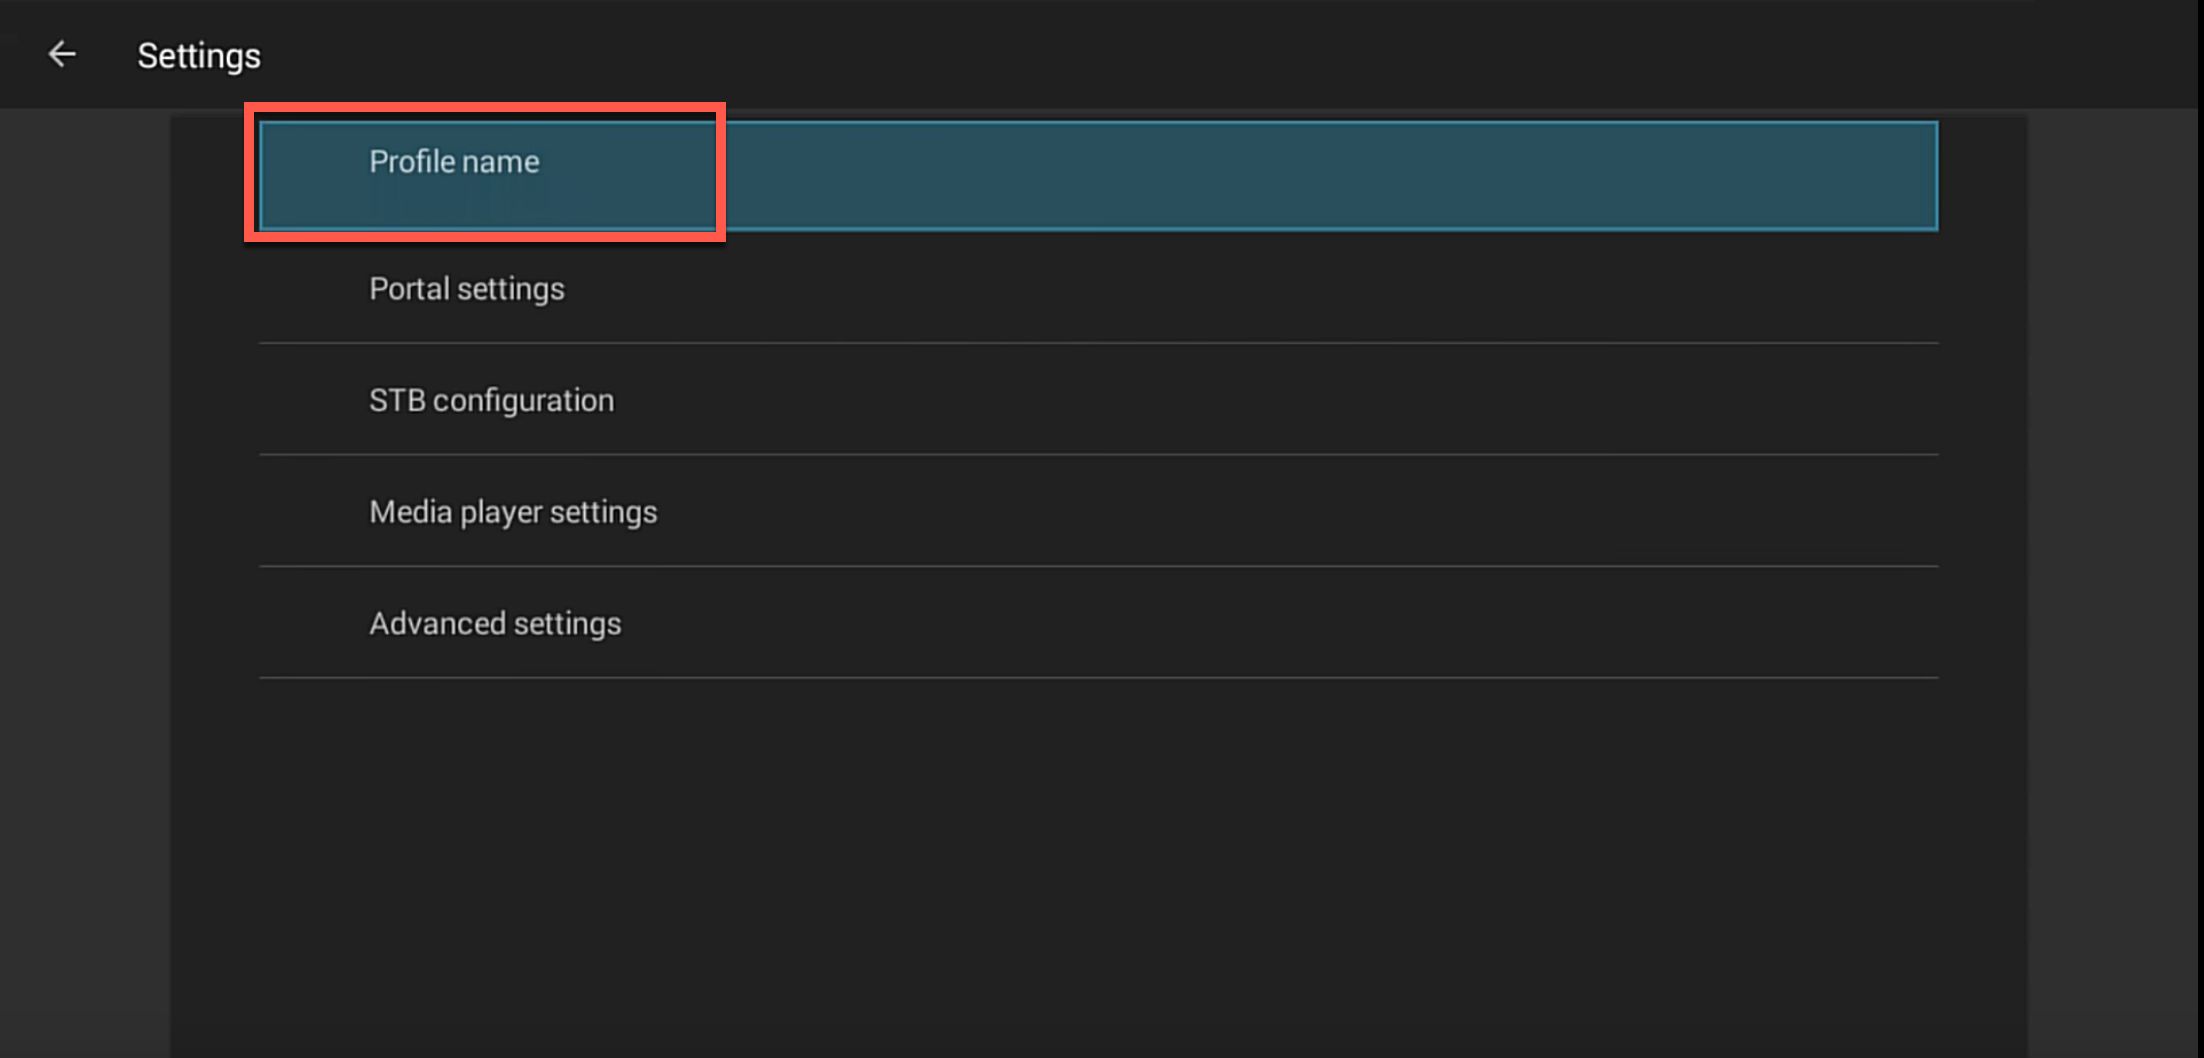
3-This is how it looks inside Profile section.
To edit the profile, we need to rename it first so later we recognize our configuration.
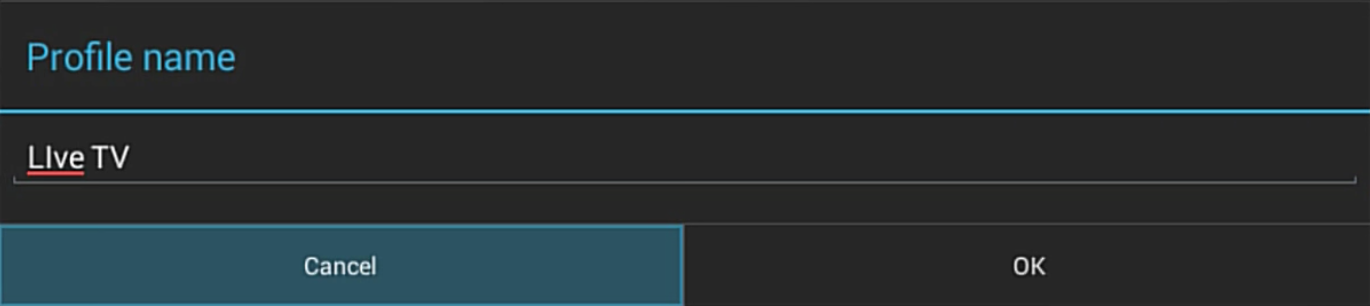
4-Let`s name it Live TV.
Now click Ok.
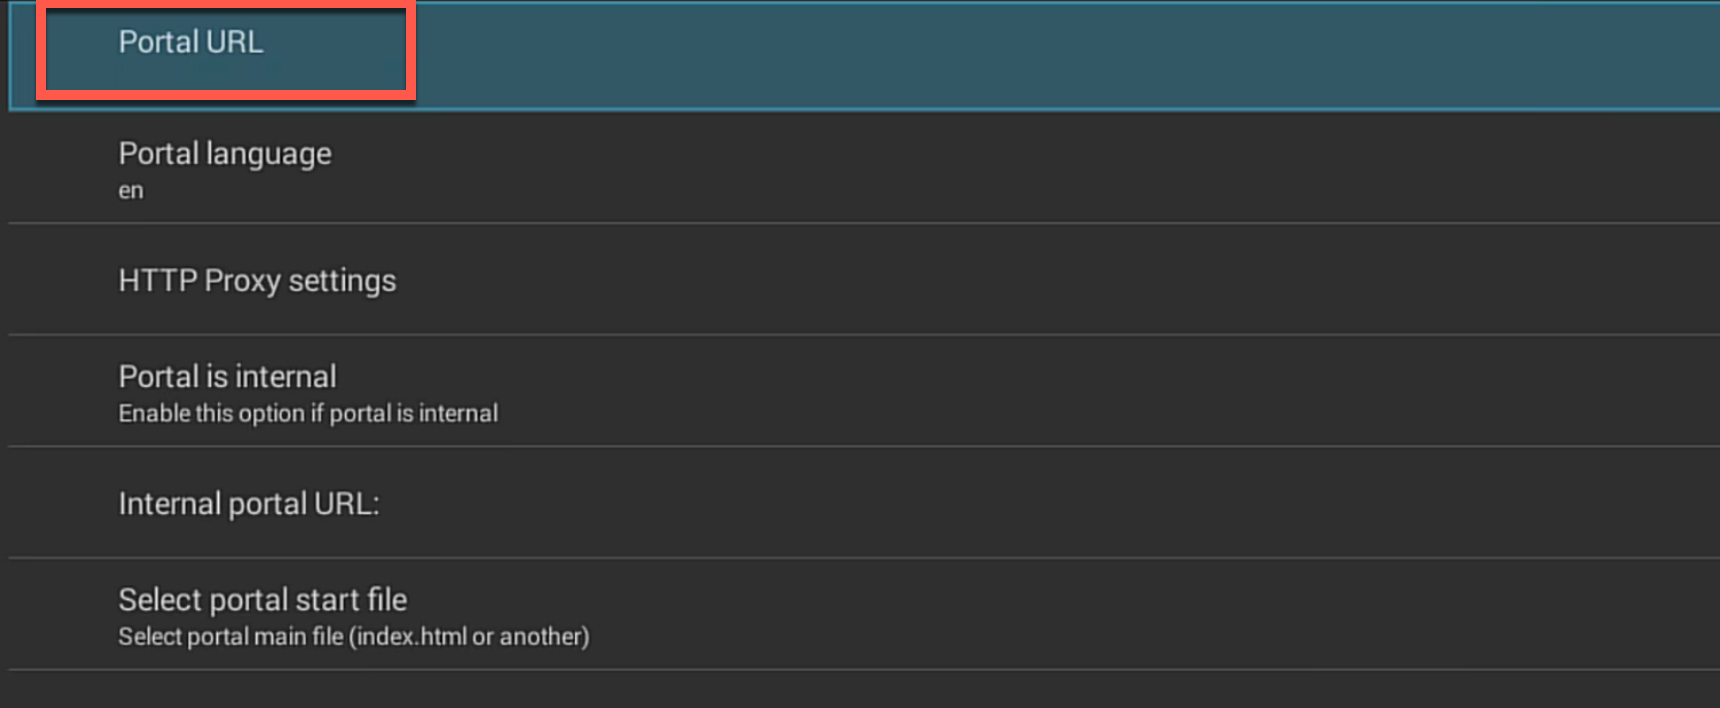
5-After naming the profile and clicking OK, you`ll go back to Profile Settings page (Step 3). From there choose Portal Settings and then you`ll have the above page. Click on Portal URL.
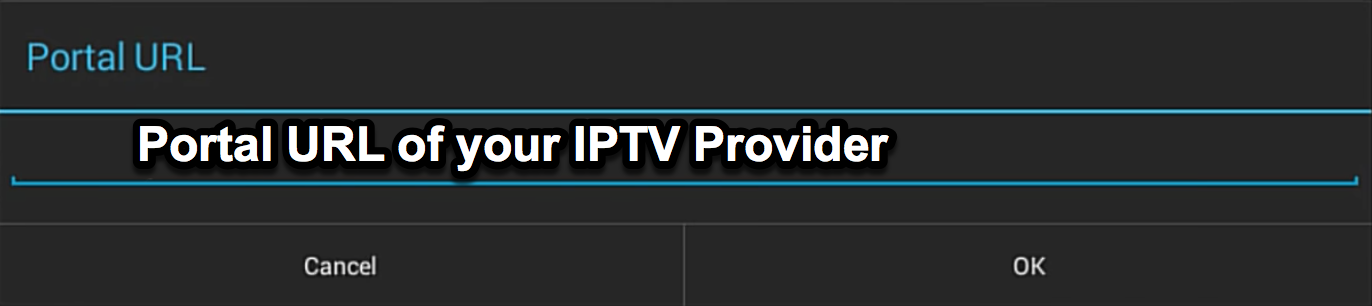
6-Now this is where we place the URL from which all the IPTV content is being delivered from IPTV Server to our App, so needs to be entered correctly. You`ll receive this from whom you get the trial/paid IPTV subscription. Type the URL, click OK and go back.
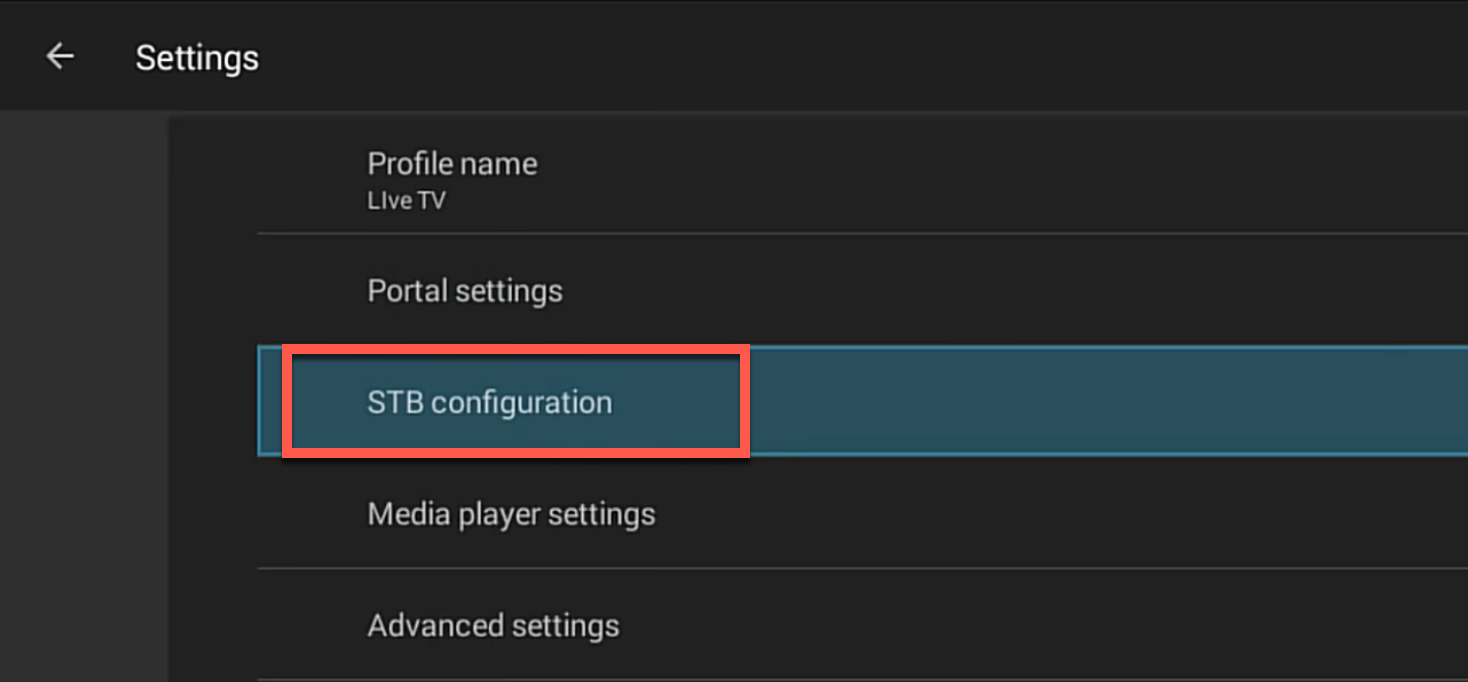
7-From Profile Settings page, choose STB Configuration.
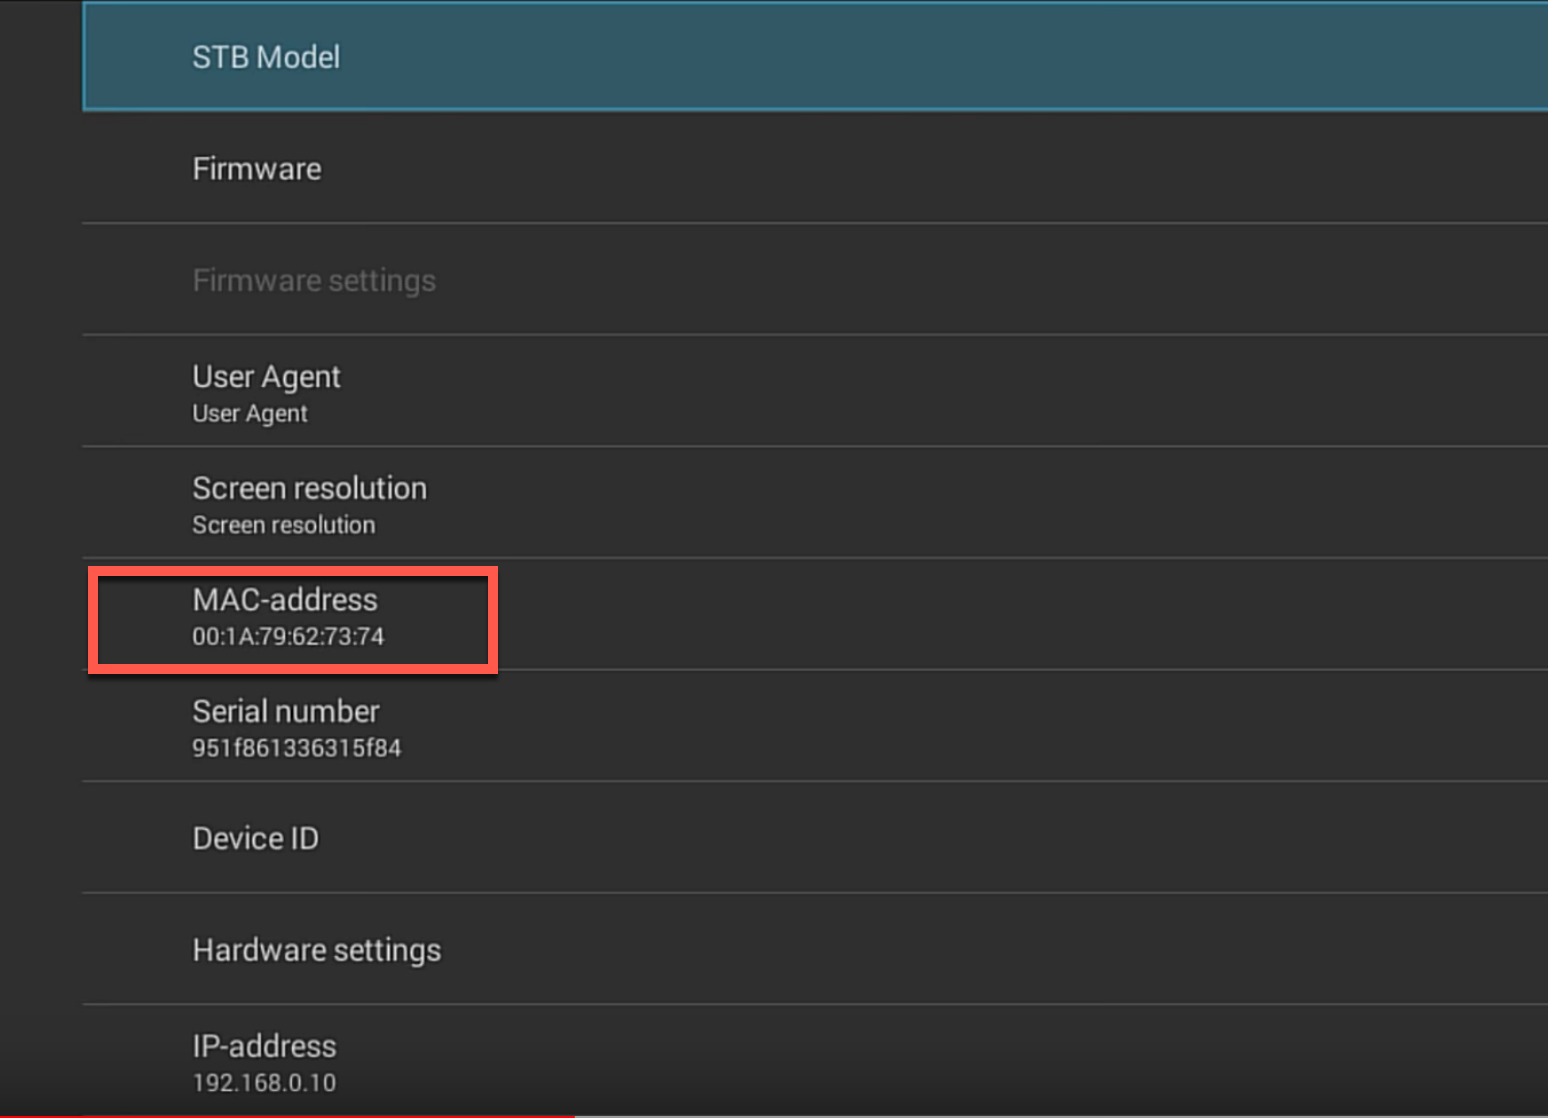
8-Here we have the last piece of the puzzle, the MAC Address. Stalker Portal activation does not have username/password for authentication. You simply send your device MAC address to the IPTV provider, they`ll activate the MAC and send you a portal URL (Step 6). So type the MAC address shown on your app (it is different from our instance for sure) and send it to your provider for activation.
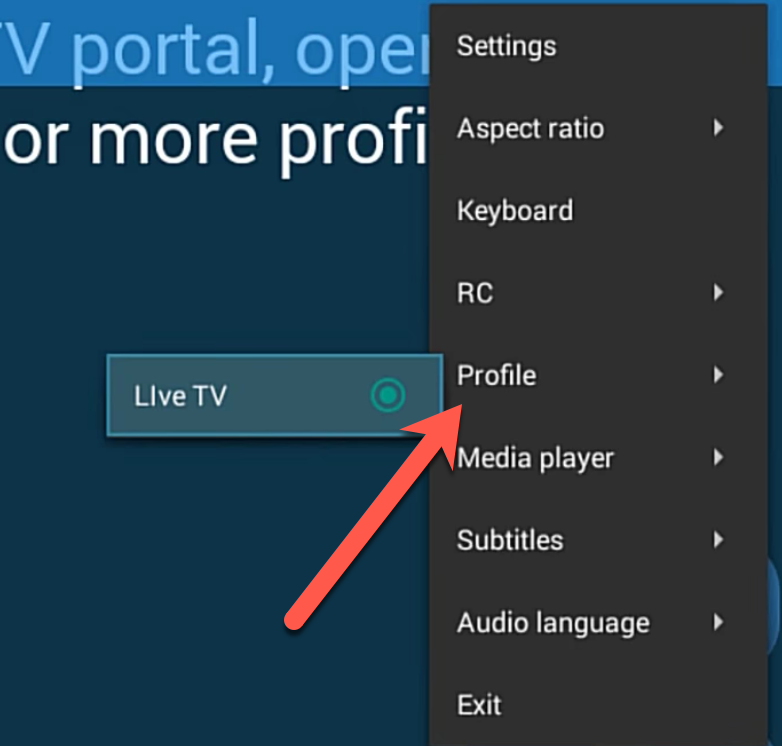
9-Now go all the way back to the main screen of the app and from the top right drop down menu sign, go to Profile and click on the profile you created earlier.
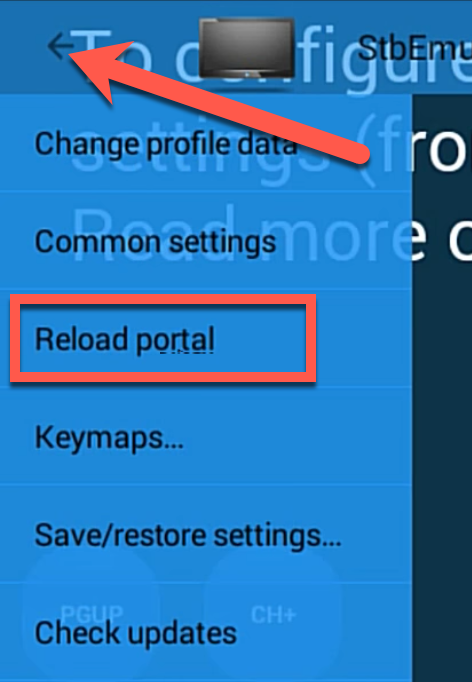
10-As an alternative, it is also possible to click on the menu sign on the top left and from the drop down menu chooseReload Portal. Since we only have one portal profile configured, it will reload that one automatically. It is sometimes necessary to reload portal due to changes being made or to sort a glitch.

11-If all properly setup, portal should be loading like above.
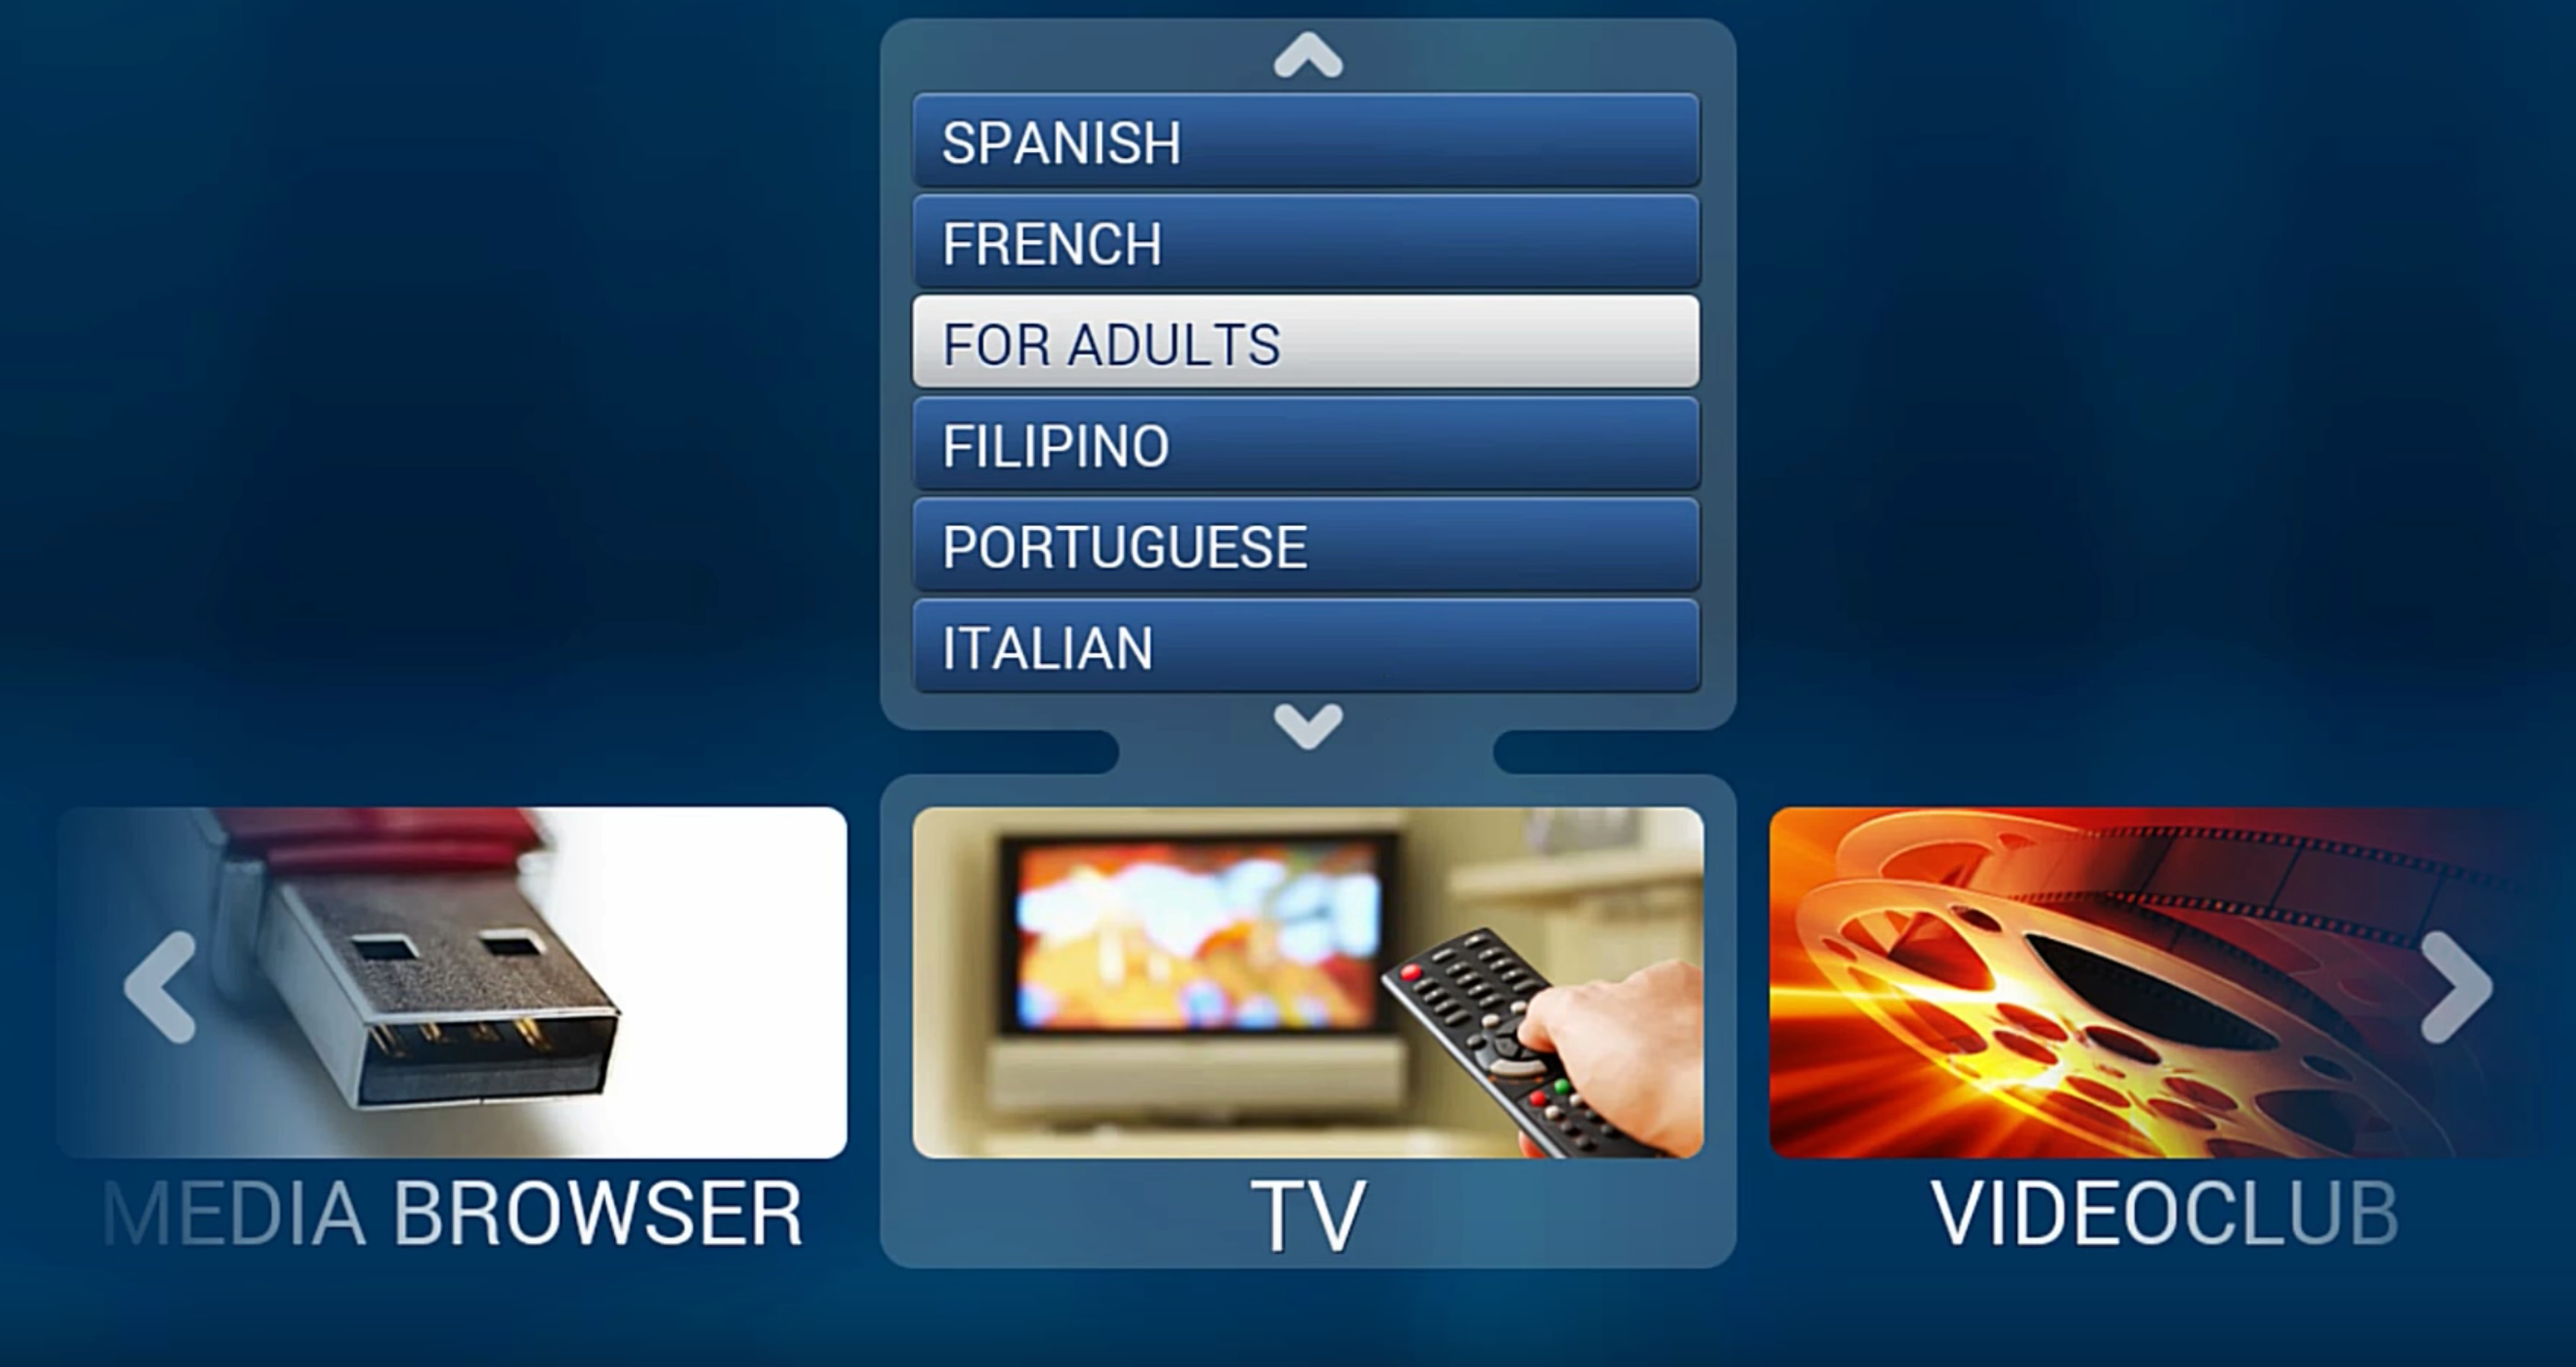
12-Portal will load like this, nice categorized form of a MAG. There you can choose between Live TV categories, Videoclub … .
